Back in 1997 or so I started building FreeBSD firewalls and proxy servers for friends and business partners. To my surprise, many of those systems ran until their hardware fell apart(literally). As those systems died nearly all of them were replaced with off-the-shelf commercial products. I was no longer in the business of building firewalls and I could not easily compete with the cost advantages of the commercial options. For a small business, your average wireless router does quite well for NAT and DHCP. At the time, the cost of $100 or so was quite reasonable. For the larger businesses - there are larger needs that include SPAM filtering, Antivirus, Intrusion Detection/Prevention, and more. The answer for them would be a Cisco device or a competitive product (such as a SonicWALL).
After kicking around a SonicWALL for a few months for my home business, I just had the feeling that I could do better with hardware that I had laying around. I was looking to replace not only the NAT functionality of the hardware, but the other services as well. It didn't take me long to discover IPCop. IPCop is an open source firewall solution with a Linux core. It's easily installed, and even easier to configure through web based management. For the hardcore enthusiast there is a growing collection of compiled add-ons for the product which include ClamAV (Gateway Antivirus), Squid (for proxying), Squidguard (for content filtering), and even Snort (for Intrusion Protection). Mix all those together, and you have yourself a very affordable unified threat management system (a term I do not throw around loosely).
It wasn't long before I started deploying my IPCop firewalls to friends, family, and small business owners (many out of charity). The hardware, while never fantastic, has always been adequate for their use and has all been purely recycled components. In some cases, I have taken a companies retired desktop PC's and turned them into managed network security solutions for them. Aside from saving a ton of money on the cost of hardware and security services, we have kept the environment from having to digest a pile of toxic components.
There was only one thing missing. I had never officially given the company a title. While working on the website, that seemed necessary. While some of you may still refer to it as "Steve's firewall business", we will be putting something more pleasing on our business cards. The official title, as the subject implies, is Candy Security. I have been tossing the name around for nearly a year and I even registered the domain name some time ago in preparation. I have most recently built a website, and today it went live!
You will have to excuse the advertisements glued to the top. I opted to get "free hosting" until I had something to put up. Now that it's up, I have to have my account converted from a free account to a paid hosting account. The last time I did this with GoDaddy, it required deleting and re-creating my account.
Hope you all like the new site. For present customers (or other interests) I created an area that you can use to contact me from the website. Obviously, if you are having problems and need immediate assistance you can still call us.
http://www.candysecurity.com
-Steve Ballantyne
Wednesday, December 27, 2006
Bad Attitudes Have No Business In the IT Business
I thought that I would post something that's non-technical today. I have had a couple of dealings with customers these past few days that were less than pleasant. One of which I knew from days past. With that, I have thought I would write up a few words on bad attitudes in IT.
It seems that throughout the nineties there were a lot of companies that had administrators and IT personnel that nobody wanted to talk to. In some cases (that I myself have witnessed) there were overpaid administrators who literally sat in a dark room most of the day and would throw a fit if anyone bothered them for assistance. In my days as an IT instructor I would often cross paths with some of these folks and I wondered why anyone would employ them.
At some point in the history of information technology it seems that we accepted that for someone to be smart and helpful in the area of computing, it should be expected that they would come with personality flaws (or even hygiene problems). Into the late nineties and early millennium many of these administrators found themselves unemployed. The job market for information technology shrank. Or, did it? Perhaps as the economy suffered, businesses of all sizes had to cut back and see who they could do without. Could they live without that mean guy who sits in the dark playing video games all day? They were willing to try.
While my training business in was booming in mid 2005 and I had no shortage of work, I was running into old colleagues and sometimes students who said that they had been trying for weeks or months to find work. What was it that they were missing? A good attitude for starters (and better hygiene for those others). Good attitudes will always make up for what you may be lacking in the area of experience. While many will say that it's not "what you know" but "who you know", I still contest that it's how you treat people that determines if you are going to get a job.
I have also been amazed at what a small world it is when it comes to information technology. I still run into people that I worked with ten or more years ago. Almost all of those people that I bump into are still in the same field. I am assuming that they are all glad to see me. But when I run into an old colleague that I had a hard time with, I will not exchange cards. In such a small world there are few rivers. Nothing will kill your career faster than burnt bridges. And nothing accelerates bridge fires like a bad attitude!
Remember to slow down, relax, and be nice to the people you work with. Be even nicer to the people that you help, or the people that help you. Compassion and kindness are instruments of business.
-Steve Ballantyne
Sunday, December 10, 2006
Building a site-to-site VPN tunnel between SonicWALL and IPCop
To perform this task, I used:
A SonicWALL TZ170 Running SonicOS Enhanced 3.2.0.3-54e
A PC running IPCop v1.4.11, with the built in VPN functionality
SonicWALL is becoming ever more popular as a good solution for the small to mid-sized business due to its lower TCO over products such as Cisco. In the same regard, IPCop has grown in popularity for its open source nature, and its large list of features. Therefore, I thought it would be interesting to see how difficult it might be to merge two companies using these very different products. In the end I can say, “not too difficult at all”.
Some things to remember:
* You must have two different networks, with different network ID’s. That is, if one company has a network ID of 192.168.0.0/24, than the other side cannot also be 192.168.0.0/24. This will be a routed network. You cannot route between two networks, that are actually the *same* network!
* SonicWALL is a commercial product and is backed by toll free phone support (which varies by product and status). Help is most certainly guaranteed. IPCop is open source. That means that your support comes in the form of forums, IRC, etc. Also note that the use of open source software comes with an agreement. Make sure that your company or organization is permitted to use open source software.
Step #1 – Set up the SonicWALL side of the tunnel.
Log into the SonicWALL Administration page. Click “VPN” on the left side, and ensure that you are now looking at “Settings”. Now under the “VPN Policies” click the Add button.
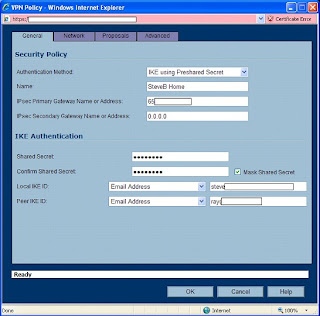
Leave the authentication drop-down at its default. Name your policy whatever you wish. You can use spaces here, it doesn’t matter.
For “Primary Gateway” you need to enter the IP address of the IPCop firewall. If this address was obtained via DHCP and will be changing, then you will need to set up Dynamic DNS for that box (Google for help on that). The SonicWALL *will* accept a hostname here instead of an IP address if DDNS is in use. For the “Secondary”, you can enter 0.0.0.0, or if left blank, the SonicWALL will enter that for you. This would be used if you had a “backup VPN” in place to another box in case this VPN fails.
Enter a secret password into the “Pre-Shared Key” area. You will need to enter this same password on the IPCop firewall. The longer the password is, and the more obscure the characters are (!@#$%^, etc), the better your encryption will be. So be creative.
For your “peer ID’s”, I would typically recommend using the default which is “IP Address”. And normally you would leave the fields blank. But, SonicWALL and IPCop did not handle that well at all. I suggest using something textual such as “E-Mail addresses”. The idea here is you would use a contact at the SonicWALL site for the SonicWALL side, and the address of an employee at the IPCop side for the IPCop settings. It doesn’t even have to be a real e-mail address, but whatever you enter in these boxes, must match the other side when we are done (local to remote, remote to local).
When done, it will look something like the illustration below. Click the Network Tab to continue.
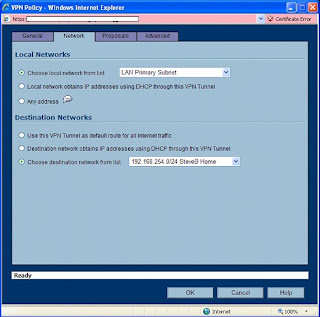
Things may get tricky here depending on how complicated your network is. We will assume that you have one standard reserved network address on your local network. In our case, the SonicWALL’s network is known as “192.168.199.0” with a subnet mask of 255.255.255.0. We could create a new “object” for that address, but instead used the default object, “LAN Primary Subnet”. If you have a whole slew of networks, or you want the wireless network to be reachable through the VPN, etc – I would suggest going through this once for one network. When you have success with one network, go back and add the others. Each end of this tunnel must be aware of the other ends networks!
For the Destination Network, we will need to create an object. So click the drop-down under “Choose a network from the list”, and then select “Create new address object”. You can name this whatever you want, but for the sake of other administrators – or yourself at a later date – use a sensible name (like the network ID itself).
Zone Assignment MUST be set to “VPN”! Next, choose “Network” as the type, and enter in the network ID information for the IPCop side of things.
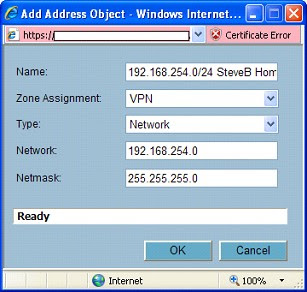
Click “OK” when done, and you should have something like this …
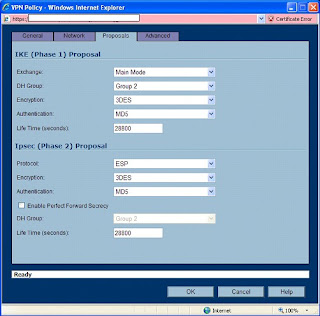
Now, click the Proposals tab. We will have to make a few changes here to find a middle ground between our two different ends of this tunnel.
For Exchange, choose Main Mode. For DH Group, choose “Group 2”. Note that we also want Group 2 down below, but we can’t change that (and don’t need to) unless “Perfect Forward Secrecy” is enabled. For Encryption, go with “3DES” (aka Triple DES). Authentication, “MD5”. Could we go with better encryption? Probably. But SonicWALL tends to have a harder time working with other devices when using stronger protocols. If you want this to work well, stick to this path. For lifetime, go with the default. We will match this on the other side. For those keeping track, 28800 seconds translates to 8 hours.
When you are all done here, it should look like this …
On the Advanced tab, there is not much that will need changed here. I like to enable a “keep alive” on one end of the VPN tunnel. This will keep the tunnel up, even when no traffic is being passed through it. In most cases, you want that kind of functionality. The alternative is a tunnel that is built “on the fly” when users start trying to send traffic through it.
You may also want to enable NetBIOS. I often do for my customers. But if this was my network, I wouldn’t want Windows broadcasts going through my tunnel. This should be a routed network! Theres a good reason that broadcasts are not routable. Additionally, if you enable that here, you may be in trouble with how the IPCop handles it at the other end.
Leave this other options alone. You’re done here. Click “OK”.
The SonicWALL will go ahead and enable this policy for you. Since only one end is complete, you should disable it. Find the little checkbox under “Enable” and uncheck it.
Now, you are halfway there.
Step #2 Configure the IPCop side of the tunnel.
Connect to your IPCop’s web administration. This can probably only be done from the LAN side, unless you have enabled remote administration. Remote administration for an IPCop box is tricky, as it entails setting up SSH – and configuring an SSH tunnel at the remote end. Again, use Google or the Ipcops.com forums for help on that.
From the admin interface, click “VPN’s” and “VPN’s” as the only choice. If you are an OpenVPN user as well, you should be happy that these two seem to work together without any problems.
On the “Global Settings” screen, enter the IP address or hostname of this IPCop firewall if it’s not all read there. For the MTU, you will need to enter “1500”, or you will have serious problems. The SonicWALL defaults to 1500. Do not enable the VPN yet. Click “Save” toward the lower right of these settings. Smile.
Now scroll down a bit to “Connection status and control” and click the “Add” button lingering around the lower center.
We will be building a “Net to Net”, so choose that second option and then click “Add”.
For name, choose anything you want. But it must be one big word without spaces or special characters. For the “IPCop side” leave the default setting of “left” (this is an obscure reference to Open SWAN settings).
In the Remote Host box, enter the IP address of the SonicWALL. This is the “public address” which should be reachable from the Internet.
For “Local Subnet” enter the ID of this IPCop’s network. All ready in there? Good! Leave it alone. For the Remote Subnet, enter the SonicWALL’s network ID in the same fashion. Network ID first, then a forward slash, then the subnet mask (for us it was 192.168.199.0/255.255.255.0).
Leave “Dead peer detection” at its default, “restart”. If the VPN goes to hell in a hand-basket, it will drop and re-establish itself.
For “Options”, we will need to enter Local and Remote ID’s. As I mentioned earlier, these are textual. Normally, the IP address is used. But I had problems with that. My advice, use email addresses. You will need to put an “@” symbol in front of them.
So for Local ID, put in the address used as the remote “Peer ID” of the SonicWALL. Then for “Remote”, use the local “Peer ID” that you used on the SonicWALL. Be sure to put them in with @ symbols leading the address, but of course still plant the @ symbol in the address where it belongs (such as “@steve.ballantyne@gmail.com”).
The “Remark” is just a comment. Leave it blank.
For Authentication, we need to enter our Pre-Shared Key (the secret password). This should match what we used on our SonicWALL to a tee, or this won’t get off the runway. Before clicking “Save” at the bottom, scroll up and uncheck the “Enable” at the top. We aren’t ready to bring this up just yet! Now, click Save.
No errors? So far, so good. Scroll down to your new VPN under “Connection status and control” and find the edit button. It looks like a little pencil. Double check your settings for consistency.
Now scroll all the way to the bottom and click “Advanced”.
NOTE: In some areas, there will be two options set (such as Grouptype). That will only confuse the SonicWALL and make life miserable for you. De-select all but what we specify (if it’s darkened, or highlighted, it’s selected).
IKE Encryption: 3DES
IKE Integrity: MD5
IKE Grouptype: MODP-1024 (this equates to “Group 2”)
IKE Lifetime: 8 hours (you will need to change this)
ESP Encryption: 3DES
ESP Integrity: MD5
ESP Groutype: MODP-1024
ESP Keylife: 8 hours
Uncheck all other options at the bottom, including “PFS”.
It looks like the picture below … Click Save.
Before bringing up your tunnel, you should probably be ready to debug it. So SSH into the IPCop firewall, and run “tail –f /var/log/messages”. You will be watching your log running by. If it’s moving too fast, that indicates a busy network … which means your timing probably isn’t good for making network changes. ;-)
If possible, get the SonicWALL Administration web page open too and head into the Log area. Now we can be ready for any error messages that hit.
Enable the IPCop side first by checking “Enabled” and “VPN on Green” and clicking the Save button. You should see some stuff roll into your log. Let it settle down.
Now go to the SonicWALL, click VPN > Settings. Enable the VPN we created earlier. Watch the IPCop log now as it fills up with interesting stuff. This is not so easily read but should indicate a Phase 1, Phase 2 success followed by some confirmation messages.
Now, on the SonicWALL side, refresh your browser window. You are looking to see a “green light” on the VPN connection, as well as an active connection status displayed at the bottom. A green light does *not* indicate success. I have had many green lights that were actually crippled non-working tunnels.
On the SonicWALL, go into the Log and see what you have. You should see several messages, the last of which will be “SA Added” indicating success. No such luck? Start debugging.
The good news is that if it didn’t work, it’s probably just a mis-match in settings. The bad news is that there are a lot of things to look over and the error messages generally are not all that helpful. So check, double check, and re-check the settings at both ends. One small typo will blow the whole thing up.
To test your VPN you can (depending on your access rules) try pinging hosts. From the SonicWALL you can click System > Diagnostic and use the Ping utility. Do not try to ping the public addresses of the firewalls, and do not ping the private addresses of the firewalls themselves. The SonicWALL will not allow you to, and the IPCop will probably lie about where the reply is actually coming from. Rather, find a host on either end that will allow ICMP traffic and ping back and forth – and ping those.
Does it all work? Good. If you are have checked everything, and can’t seem to get things to work, feel free to contact me. Just know that you understand your own networks far better than I do, so a resolution may be difficult coming from someone outside.
Enjoy,
-Steve Ballantyne
A SonicWALL TZ170 Running SonicOS Enhanced 3.2.0.3-54e
A PC running IPCop v1.4.11, with the built in VPN functionality
SonicWALL is becoming ever more popular as a good solution for the small to mid-sized business due to its lower TCO over products such as Cisco. In the same regard, IPCop has grown in popularity for its open source nature, and its large list of features. Therefore, I thought it would be interesting to see how difficult it might be to merge two companies using these very different products. In the end I can say, “not too difficult at all”.
Some things to remember:
* You must have two different networks, with different network ID’s. That is, if one company has a network ID of 192.168.0.0/24, than the other side cannot also be 192.168.0.0/24. This will be a routed network. You cannot route between two networks, that are actually the *same* network!
* SonicWALL is a commercial product and is backed by toll free phone support (which varies by product and status). Help is most certainly guaranteed. IPCop is open source. That means that your support comes in the form of forums, IRC, etc. Also note that the use of open source software comes with an agreement. Make sure that your company or organization is permitted to use open source software.
Step #1 – Set up the SonicWALL side of the tunnel.
Log into the SonicWALL Administration page. Click “VPN” on the left side, and ensure that you are now looking at “Settings”. Now under the “VPN Policies” click the Add button.
Leave the authentication drop-down at its default. Name your policy whatever you wish. You can use spaces here, it doesn’t matter.
For “Primary Gateway” you need to enter the IP address of the IPCop firewall. If this address was obtained via DHCP and will be changing, then you will need to set up Dynamic DNS for that box (Google for help on that). The SonicWALL *will* accept a hostname here instead of an IP address if DDNS is in use. For the “Secondary”, you can enter 0.0.0.0, or if left blank, the SonicWALL will enter that for you. This would be used if you had a “backup VPN” in place to another box in case this VPN fails.
Enter a secret password into the “Pre-Shared Key” area. You will need to enter this same password on the IPCop firewall. The longer the password is, and the more obscure the characters are (!@#$%^, etc), the better your encryption will be. So be creative.
For your “peer ID’s”, I would typically recommend using the default which is “IP Address”. And normally you would leave the fields blank. But, SonicWALL and IPCop did not handle that well at all. I suggest using something textual such as “E-Mail addresses”. The idea here is you would use a contact at the SonicWALL site for the SonicWALL side, and the address of an employee at the IPCop side for the IPCop settings. It doesn’t even have to be a real e-mail address, but whatever you enter in these boxes, must match the other side when we are done (local to remote, remote to local).
When done, it will look something like the illustration below. Click the Network Tab to continue.

Things may get tricky here depending on how complicated your network is. We will assume that you have one standard reserved network address on your local network. In our case, the SonicWALL’s network is known as “192.168.199.0” with a subnet mask of 255.255.255.0. We could create a new “object” for that address, but instead used the default object, “LAN Primary Subnet”. If you have a whole slew of networks, or you want the wireless network to be reachable through the VPN, etc – I would suggest going through this once for one network. When you have success with one network, go back and add the others. Each end of this tunnel must be aware of the other ends networks!
For the Destination Network, we will need to create an object. So click the drop-down under “Choose a network from the list”, and then select “Create new address object”. You can name this whatever you want, but for the sake of other administrators – or yourself at a later date – use a sensible name (like the network ID itself).
Zone Assignment MUST be set to “VPN”! Next, choose “Network” as the type, and enter in the network ID information for the IPCop side of things.

Click “OK” when done, and you should have something like this …

Now, click the Proposals tab. We will have to make a few changes here to find a middle ground between our two different ends of this tunnel.
For Exchange, choose Main Mode. For DH Group, choose “Group 2”. Note that we also want Group 2 down below, but we can’t change that (and don’t need to) unless “Perfect Forward Secrecy” is enabled. For Encryption, go with “3DES” (aka Triple DES). Authentication, “MD5”. Could we go with better encryption? Probably. But SonicWALL tends to have a harder time working with other devices when using stronger protocols. If you want this to work well, stick to this path. For lifetime, go with the default. We will match this on the other side. For those keeping track, 28800 seconds translates to 8 hours.
When you are all done here, it should look like this …

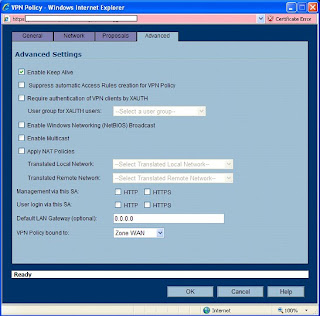
On the Advanced tab, there is not much that will need changed here. I like to enable a “keep alive” on one end of the VPN tunnel. This will keep the tunnel up, even when no traffic is being passed through it. In most cases, you want that kind of functionality. The alternative is a tunnel that is built “on the fly” when users start trying to send traffic through it.
You may also want to enable NetBIOS. I often do for my customers. But if this was my network, I wouldn’t want Windows broadcasts going through my tunnel. This should be a routed network! Theres a good reason that broadcasts are not routable. Additionally, if you enable that here, you may be in trouble with how the IPCop handles it at the other end.
Leave this other options alone. You’re done here. Click “OK”.

The SonicWALL will go ahead and enable this policy for you. Since only one end is complete, you should disable it. Find the little checkbox under “Enable” and uncheck it.
Now, you are halfway there.
Step #2 Configure the IPCop side of the tunnel.
Connect to your IPCop’s web administration. This can probably only be done from the LAN side, unless you have enabled remote administration. Remote administration for an IPCop box is tricky, as it entails setting up SSH – and configuring an SSH tunnel at the remote end. Again, use Google or the Ipcops.com forums for help on that.
From the admin interface, click “VPN’s” and “VPN’s” as the only choice. If you are an OpenVPN user as well, you should be happy that these two seem to work together without any problems.
On the “Global Settings” screen, enter the IP address or hostname of this IPCop firewall if it’s not all read there. For the MTU, you will need to enter “1500”, or you will have serious problems. The SonicWALL defaults to 1500. Do not enable the VPN yet. Click “Save” toward the lower right of these settings. Smile.
Now scroll down a bit to “Connection status and control” and click the “Add” button lingering around the lower center.
We will be building a “Net to Net”, so choose that second option and then click “Add”.
For name, choose anything you want. But it must be one big word without spaces or special characters. For the “IPCop side” leave the default setting of “left” (this is an obscure reference to Open SWAN settings).
In the Remote Host box, enter the IP address of the SonicWALL. This is the “public address” which should be reachable from the Internet.
For “Local Subnet” enter the ID of this IPCop’s network. All ready in there? Good! Leave it alone. For the Remote Subnet, enter the SonicWALL’s network ID in the same fashion. Network ID first, then a forward slash, then the subnet mask (for us it was 192.168.199.0/255.255.255.0).
Leave “Dead peer detection” at its default, “restart”. If the VPN goes to hell in a hand-basket, it will drop and re-establish itself.
For “Options”, we will need to enter Local and Remote ID’s. As I mentioned earlier, these are textual. Normally, the IP address is used. But I had problems with that. My advice, use email addresses. You will need to put an “@” symbol in front of them.
So for Local ID, put in the address used as the remote “Peer ID” of the SonicWALL. Then for “Remote”, use the local “Peer ID” that you used on the SonicWALL. Be sure to put them in with @ symbols leading the address, but of course still plant the @ symbol in the address where it belongs (such as “@steve.ballantyne@gmail.com”).
The “Remark” is just a comment. Leave it blank.
For Authentication, we need to enter our Pre-Shared Key (the secret password). This should match what we used on our SonicWALL to a tee, or this won’t get off the runway. Before clicking “Save” at the bottom, scroll up and uncheck the “Enable” at the top. We aren’t ready to bring this up just yet! Now, click Save.
No errors? So far, so good. Scroll down to your new VPN under “Connection status and control” and find the edit button. It looks like a little pencil. Double check your settings for consistency.
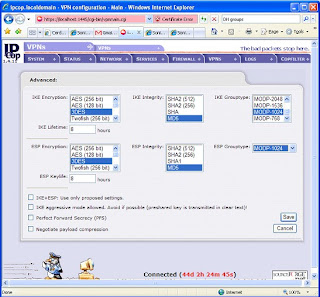
Now scroll all the way to the bottom and click “Advanced”.
NOTE: In some areas, there will be two options set (such as Grouptype). That will only confuse the SonicWALL and make life miserable for you. De-select all but what we specify (if it’s darkened, or highlighted, it’s selected).
IKE Encryption: 3DES
IKE Integrity: MD5
IKE Grouptype: MODP-1024 (this equates to “Group 2”)
IKE Lifetime: 8 hours (you will need to change this)
ESP Encryption: 3DES
ESP Integrity: MD5
ESP Groutype: MODP-1024
ESP Keylife: 8 hours
Uncheck all other options at the bottom, including “PFS”.
It looks like the picture below … Click Save.

Before bringing up your tunnel, you should probably be ready to debug it. So SSH into the IPCop firewall, and run “tail –f /var/log/messages”. You will be watching your log running by. If it’s moving too fast, that indicates a busy network … which means your timing probably isn’t good for making network changes. ;-)
If possible, get the SonicWALL Administration web page open too and head into the Log area. Now we can be ready for any error messages that hit.
Enable the IPCop side first by checking “Enabled” and “VPN on Green” and clicking the Save button. You should see some stuff roll into your log. Let it settle down.
Now go to the SonicWALL, click VPN > Settings. Enable the VPN we created earlier. Watch the IPCop log now as it fills up with interesting stuff. This is not so easily read but should indicate a Phase 1, Phase 2 success followed by some confirmation messages.
Now, on the SonicWALL side, refresh your browser window. You are looking to see a “green light” on the VPN connection, as well as an active connection status displayed at the bottom. A green light does *not* indicate success. I have had many green lights that were actually crippled non-working tunnels.
On the SonicWALL, go into the Log and see what you have. You should see several messages, the last of which will be “SA Added” indicating success. No such luck? Start debugging.
The good news is that if it didn’t work, it’s probably just a mis-match in settings. The bad news is that there are a lot of things to look over and the error messages generally are not all that helpful. So check, double check, and re-check the settings at both ends. One small typo will blow the whole thing up.
To test your VPN you can (depending on your access rules) try pinging hosts. From the SonicWALL you can click System > Diagnostic and use the Ping utility. Do not try to ping the public addresses of the firewalls, and do not ping the private addresses of the firewalls themselves. The SonicWALL will not allow you to, and the IPCop will probably lie about where the reply is actually coming from. Rather, find a host on either end that will allow ICMP traffic and ping back and forth – and ping those.
Does it all work? Good. If you are have checked everything, and can’t seem to get things to work, feel free to contact me. Just know that you understand your own networks far better than I do, so a resolution may be difficult coming from someone outside.
Enjoy,
-Steve Ballantyne
Saturday, December 02, 2006
SonicWALL's Zapchast Virus Issues
Friday I got support ticket from one of our larger customers, Ohio State University. They were attempting to download and update one of their Symantec antivirus products but the SonicWALL was preventing the file transfer saying that it was infected with the "Zapchast virus". The support folks have access to their SonicWALL (while most of our customers do not). They knew that this was a false alarm and a mistake. So they went into the SonicWALL and disabled the antivirus from that zone. That ought to do it, right?
Wrong.
Here is one of my many complaints about SonicWALL products. When you identify something that isn't working correctly you should be able to easily turn it off, or make an exclusion. While SonicWALL's do give you the ability to exclude certain IP addresses from the antivirus feature, it doesn't work. That's right. You can add those addresses to the exclusion list and it will exclude them. Bit if you have one of these hum-dinger mistake signatures that feature simply "does not work". Next, I would normally recommend removing the antivirus feature from the network zone. That's Network > Zones, from the administration pages. Yet, remove it from the zone all you like. That won't work either.
The only sure fire way to stop the SonicWALL from blocking something like this is to disable the entire antivirus, anti-spyware, and intrusion prevention engines and then reboot the box. Obviously, that is not a viable solution for a University who is supporting thousands of simultaneous connections. Not to mention that this seems pretty unnecessary just to download a single file that you need.
I have had similar problems with intrusion prevention signatures. SonicWALL will write a new signature and put it out there, only to find that it's causing horrible problems and stopping all sorts of legitimate traffic. They will eventually get around to fixing or removing the signature but until an update is available you are in trouble. The difference is that you can disable an intrusion prevention signature. You can't disable a virus signature. You have to understand the logic in that. Intrusion detection is bound to have false positives. Someone may be trying to 'break in' to your network, but that could be a legitimate user trying to run some sort of cryptic report (which looks like an attack). Virus's on the other hand - are always virus's. It's not as if it "might be a virus, might not be".
I suppose the problem here, is that SonicWALL needs to admit that they make mistakes (often) and give us the ability to work around them. Until then we will continue to tell customers that "they are working on it" ... and we will hope that they actually ARE working on it.
Until next time,
-Steve Ballantyne
Subscribe to:
Comments (Atom)