Showing posts with label sonicwall. Show all posts

Tuesday, January 30, 2007

Building a Site-to-Site VPN Between SonicWALL and Linksys

A week or so ago I got a call from a customer who had gone out and purchased a Linksys router "with IPSec VPN" support. He was interested in placing this device at a remote site, and creating a VPN tunnel back to the SonicWALL that we manage. I recommended that he purchase SonicWALL devices for each site (he had more that he wanted to set up), but he was not interested in forking over the thousands of dollars that it would cost him ... and I couldn't blame him.

I have created VPN's between all sorts of odd ball devices, so I didn't think that this one would be any different. Yet this Linksys device would turn out to have quite a few caveats, hence my documentation here.

Some things to know about these new Linksys VPN devices: They used an embedded version of OpenSWAN, they have been known to slack on standards (such as encryption key length), they are not at *all* supported by SonicWALL (probably because of the loose interpretation of standards), you *CANNOT* have spaces in your policy name (it will accept them, but your policy will be broken).

Now, onto the "how to". For this example, I was using a Linksys RVS4000 with Firmware Version: V1.0.11 (out of the box default stuff). The SonicWALL is a Pro 2040 running the latest enhanced firmware, 3.2.0.3e. Note: I did not upgrade the Linksys firmware as I should not be supporting that device at all. Additionally, I am doing all of it's configuration remotely. I would never *dare* update firmware on a device over the Internet (and neither should you).

The Linksys configuration will be a tad more complicated, so we will start with that. Our goal will be to match the settings of the SonicWALL so that the second part goes easier. I have tried all sorts of mis-matched settings, and some of them worked. But if you want this to go smoothly you should stick to what you see here. Go ahead and get logged into your Linksys (if you need help with this part, RTFM).

Once logged in, click VPN from the top, and then VPN Passthrough. We want to *disable* all of these options. This is enabled for people who want to use a remote VPN client from behind this device. We are going to terminate the VPN to this device itself, so we do not want or need any of this enabled. It would only confuse the Linksys. After you disable them, be sure to click the Save Settings button.


Next, also under VPN at the top, click "IPSec VPN". This will bring up a window that you have to scroll through to see all of the options. For tunnel entry it will read "new". We will start with a name. It's HIGHLY important that you NOT use any spaces here. I made this mistake, and it took me an hour or so of troubleshooting cryptic messages to figure it out. Linksys should *not* all you to enter spaces here, but they do.


Keep scrolling and have a look at the other settings here. You can refer to this snapshot that I took.


For this policy that I created, I used "Subnet" for both local and remote. This is usually what you are trying to accomplish. That is, you have two networks (must be different networks) and you want to allow traffic to pass between them. You can also create a "host to network" configuration where one computer accesses a subnet (or vice versa). Obviously, local network should be what is configured on the Linksys device. Remote network, is what the primary subnet is defined as on the SonicWALL side.

For the Remote Security Gateway, choose IP address and put in the static IP of the SonicWALL. If you SonicWALL does not have a static IP, you can pick the "any" option here. But that also means that you would need to later use "agressive mode" and change the "Local Identity" and "Remote Identity" to a "Name" under advanced settings. Hopefully you have a static IP. That makes things easy. :-) Make sure you enter the static IP of the SonicWALL!! Not the SonicWALL's gateway IP (people confuse what they want in this box).

For Key Exchange Method we want to leave it at Auto. Flipping over to manual unlocks a lot of options that I wouldn't want to try and match up to the SonicWALL. For Encryption choose "3DES" (you have no other choice). For Authentication pick "SHA1" as this is what the SonicWALL uses as default. Make sure you disable "PFS" (also default on the SonicWALL). For Pre-Shared key enter a secret word (feel free to use special characters here, it makes the encryption stronger). You will need this password later when you configure the SonicWALL side. Lastly, for Key Life Time enter "28800".

Before you do anything else find the Save Settings button at the bottom which is almost hidden in the colored bar. Save those settings, and then scroll back down to the bottom of the screen and click the "Advanced Settings" button. You will get a pop-up window, so turn off any stupid pop-up blockers that you may be using.

Here is a snapshot that you can follow along with ...


For your Operational Mode, you want to use Main Mode. That is, unless the other end is using a dynamic IP address (in which case you would use Aggressive). For the Local and Remote Identity boxes, leave them at the default settings. This is telling the Linksys that it will trust the SonicWALL's identity based on the IP address that it is connecting from.

For encryption, use "3DES" and change the Authentication to "SHA1". Trust me, life will be easier on you when it comes time to configure the SonicWALL. For the "Group" you want to pick "1024-bit". Most people would call this "DH Group 2" (like the SonicWALL will). Make sure you also change this Key Lifetime to 28800. We do this, because the SonicWALL is not that flexible on these options. Some devices offer a lot of options for keys and might even expire them based on the amount of data being transferred. Again, to make like easier ... just make this 28800 seconds. Lastly, click the "Save Settings" button. Then "Close" this window. You're done here.

For the SonicWALL side, get logged into your SonicWALL and select "VPN" on the left side. Then, click the Add button to get a new policy (otherwise called an "SA") started up. If you have trouble here, RTFM!

We will start with the first tab. Here is a snapshot to follow along with ...


For Authenication Method, stick to the default. For name, pick whatever you want. If you are going to have a lot of these, you might want to pick a name that matches the Linksys at the other end. Or you can put something more meaningful here. SonicWALL will not punish you for using spaces. ;-)

For the IPsec Primary Gateway, enter the public IP address of the Linksys device. If it is using a dynamic IP, you can enter all zeroes here. Bear in mind, you would also have to change to agressive mode (at both ends) and use different "Local/Remote IKE ID" information. For the "Secondary" you can either enter zeroes, or let the SonicWALL do it for you. This field is in case you want to have a "failover" tunnel.

For the Shared Secret, enter the same Pre-Shared key that you used on the Linksys. This is your "secret word". Leave the Local and Peer IKE ID's alone (SonicWALL will know what to do here). Next, click the Network tab and have a look.


For the "Choose local network" you have some options here. If this is the only tunnel you will ever create, you can pick "LAN Primary Subnet". I have found that you can only use that object once in a policy, so I have got in the habit of making a new object that is a bit redundant. Click the drop down and choose "add network". I like to name it something meaningful such as use the network ID in the name, followed by a short description. Then if you have to look at this later, you will see the network ID right here in the policy. Now, make sure you create this is a "LAN" object, type is "Network". Enter the Network ID that this SonicWALL is configured for, and it's subnet mask. After you click "OK" you will be right back at this window.

For remote network, create a new network object that matches the Linksys. Your zone MUST BE "VPN" FOR THIS OBJECT. If it's not, this tunnel will not work!! Now you are ready to click the third tab "Proposals", and have a look.


Now we can be glad that we made all those changes to the Linksys. For Exchange, leave it at "Main Mode" (unless you had to switch to aggressive). For DH Group, leave it at Group 2 (which means, 1024-bit on the Linksys). Use all of the other settings that we did on the Linksys: 3DES, SHA1 and 28800 seconds. For Phase 2, leave the default of ESP, 3DES, and SHA1. Also notice, the default Life Time is 28800 here, and PFS is Disabled! In essence, you should change nothing here, but make sure everything matches up.

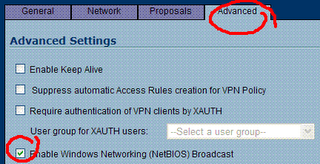
Now clidk the Advanced tab. There are some things here you may need later. I don't like the thought of NetBIOS going over a routed network. Some folks might need that option though (for lousy name resolution or old network printing). Also, its a good idea to check the Keep Alive option ... but do that later. One of the lessons I have learned is that if you run a Keep Alive on a bad configuration, your log will fill up with a bunch of failed attempts. Rather, wait until this tunnel is coming up successfully and make a note to come back and add this option. The Keep Alive will maintain this tunnel even when there is no traffic running across it. I like to keep tunnels up all the time, so that when people need to send traffic across it - the tunnel is up and ready.

Now comes the fun part. Click OK on the SonicWALL policy to save it away. Note that it's all ready "Enabled". Watching this screen will get you nowhere. It does not refresh, ever. So head back over to the Linksys device now in a different tab/window - and click that Enable button at the bottom of the policy window. Now, on the SonicWALL you can click the VPN > Settings option on the left which will refresh this screen. Do you have a "green light" on the SonicWALL's policy? Does it show an active connection in the lower portion of the window? Great! No green light? You have problems ... keep reading.

Regardless of whether or not it worked, you had better read the logs. I find that the SonicWALL logs are far better (at least in this match-up). So click "Log" on the SonicWALL and see what you have. A successful policy would look like this ...


Note that the first line in the log, is the last thing that it recorded. Your policy notes should end with "Adding IPSec SA" as you see in the illustration. If it all looks well, try to run some traffic through the tunnel. Bear in mind, you cannot ping the internal interfaces of the two devices. That is, you cannot ping the Linksys's LAN IP from the SonicWALL (or vice versa). I'm really not sure why this is, but I think it may have to do with the way that these devices are terminating the tunnel from end to end. So instead, try getting onto a PC connected to one network and ping a PC at the other end. If that fails - check the logs for errors, and also remember to disable personal/Windows firewalls! ;-)

Troubleshooting/Caveats
I had some STRANGE problems when I first attempted this. I hope this helps someone out there.

1) The SonicWALL reports that the settings don't match, but they do! - I had the SonicWALL at one point tell me that the DH groups were different, when they were in fact matched. There was no convincing it otherwise, and the solution was to delete the policy, RESTART the SonicWALL, and start over. Don't waste your time trying anything else.

2) The tunnel is up, but traffic is not passing across it. - Check that the "remote" network on the SonicWALL side is configured as a "VPN" zoned object. You can find this setting in Network > Address Objects. If you accidentally made it a LAN or WAN object, you should go back to your policy, choose a different object (or create a new one) and name it something different. Then, go back and delete the one you made with errors.

3) The Linksys is not even starting the tunnel connection! - Did you put spaces in the policy name on the Linksys device? If you did, delete the policy and start over from scratch. Also check ALL of your settings and match them up. Look at the logs at *both ends* for clues, but know that the SonicWALL will be more helpful in determining the problem.

One thing I will say in favor of Linksys, their Log is "detachable" where SonicWALL keeps theirs glued down. What I mean is that you can create a Log "pop up" from the Linksys and keep that window aside while you troubleshoot. Here is how ...


FIRST - Disabled your policy on the Linksys to stop it from logging junk. Then, click Administration > Log. You need to enable the Local Log as it is not turned on by default. Then make sure you Save Settings. Once that has been done, you can click the "View Log" button and you get a nice little logging window. It's not very big, and it doesn't refresh itself. So you will have to refresh it, and actually turn through the pages yourself. Also, the messages you will get will only make sense to someone who has worked extensively with OpenSWAN. Yet, pasting these errors in Google may uncover some good hints.

Once you have enabled your logging and you have your window up, go back and click "Enable" on the policy. Then refresh your log, and turn through the four or five pages of messages. Good luck!! ;-)

If you are attempting this and get stuck, feel free to comment, share your advice, point out my wrong doings, etc.

-Steve Ballantyne

Saturday, December 02, 2006

SonicWALL's Zapchast Virus Issues

Friday I got support ticket from one of our larger customers, Ohio State University. They were attempting to download and update one of their Symantec antivirus products but the SonicWALL was preventing the file transfer saying that it was infected with the "Zapchast virus". The support folks have access to their SonicWALL (while most of our customers do not). They knew that this was a false alarm and a mistake. So they went into the SonicWALL and disabled the antivirus from that zone. That ought to do it, right?

Wrong.

Here is one of my many complaints about SonicWALL products. When you identify something that isn't working correctly you should be able to easily turn it off, or make an exclusion. While SonicWALL's do give you the ability to exclude certain IP addresses from the antivirus feature, it doesn't work. That's right. You can add those addresses to the exclusion list and it will exclude them. Bit if you have one of these hum-dinger mistake signatures that feature simply "does not work". Next, I would normally recommend removing the antivirus feature from the network zone. That's Network > Zones, from the administration pages. Yet, remove it from the zone all you like. That won't work either.

The only sure fire way to stop the SonicWALL from blocking something like this is to disable the entire antivirus, anti-spyware, and intrusion prevention engines and then reboot the box. Obviously, that is not a viable solution for a University who is supporting thousands of simultaneous connections. Not to mention that this seems pretty unnecessary just to download a single file that you need.

I have had similar problems with intrusion prevention signatures. SonicWALL will write a new signature and put it out there, only to find that it's causing horrible problems and stopping all sorts of legitimate traffic. They will eventually get around to fixing or removing the signature but until an update is available you are in trouble. The difference is that you can disable an intrusion prevention signature. You can't disable a virus signature. You have to understand the logic in that. Intrusion detection is bound to have false positives. Someone may be trying to 'break in' to your network, but that could be a legitimate user trying to run some sort of cryptic report (which looks like an attack). Virus's on the other hand - are always virus's. It's not as if it "might be a virus, might not be".

I suppose the problem here, is that SonicWALL needs to admit that they make mistakes (often) and give us the ability to work around them. Until then we will continue to tell customers that "they are working on it" ... and we will hope that they actually ARE working on it.

Until next time,
-Steve Ballantyne

Tuesday, November 28, 2006

What's In a Name?

In the realm of Microsoft, it seems that "name resolution" is always the answer to the question, "why doesn't this !@#&*^ thing work?". Crossing over into a career in Network Security I have found that I will never escape this problem.

The past two days it seems that about sixty percent of my problems have been with customers who are expecting name resolution to "just work". Take for example one of my SonicWALL owners who has recently built a VPN tunnel between two offices. I am always quick to tell them that "if you cannot access a resource by name, try it by IP address". For some, accessing resources by IP address does not propose any problems. For others, this is quite an obstacle. It's getting to be that most of my calls revolve around name resolution problems of some sort. Therefore, today I would like to cover ...

Why Name Resolution Doesn't Work over my SonicWALL VPN Tunnel

Did you enable NetBIOS on the Security Association? - Remember that NetBIOS is a broadcast mechanism. It has no business being sent through a routed network. A VPN tunnel is a routed network. You should edit the VPN Policy, head into the "Advanced" tab and look for "NetBIOS Broadcasts". You need to check that option at *both* ends of the tunnel when possible.


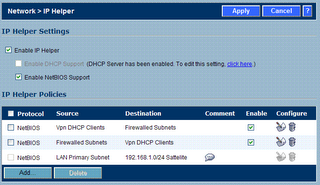
Have you tried the IP Helper? - This is a goofy fix. At this point, I would question what you are trying to accomplish here. Remember that Microsoft has made several attempts over the years to banish "broadcast name resolution" from networks in favor of DNS. I don't want to get up on my soapbox and start yelling at you though. So you might try this - it fixes quite a bit.


Go into Network > IP Helper and first enable the helper, while selecting NetBIOS below it. You will need to "Apply" for that to be effective. Next, you will need to create TWO policies. One for each directional flow of traffic. That is, if you were doing this for a remote user VPN (WAN GroupVPN) make one that says "source: VPN DHCP Clients, dest: Firewalled Subnets", and then reverse it. Like this ...


Use Your Own DNS Server - If you have a DNS server at one end of this tunnel, consider using it for clients at the other end. What do I mean? Imagine "network A" has a DNS server which Active Directory uses. In fact, the Active Directory server is almost always also the DNS server for smaller businesses. That server should resolve the names of *ALL* your internal clients. It should also have "forwarders" configured so that when you ask it who http://www.google.com/ is, it will send that request to a DNS server on the Internet for an answer.

That being said, when users on the remote end of the VPN tunnel ("network B") are connecting, they should *also* use that DNS server. What you will find though, is that they are probably configured to use a public (Internet) DNS server when they connect. That's because you configured DNS on the SonicWALL for the WAN Interface. It then uses those DNS servers as the primary and secondary servers for it's DHCP scope. So, if this is a "site to site" tunnel, you will need to change the DHCP scope of that local SonicWALL having the name resolution issues. If you are using a remote user VPN (WAN GroupVPN) you need to change the DHCP scope of the SonicWALL that they are connecting to. You should *not* change the WAN Interfaces DNS server addresses. You don't need to!

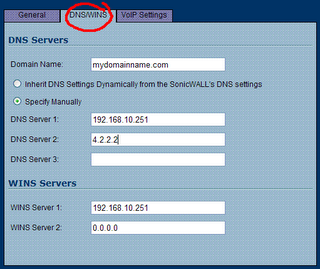
You would do this: Click Network > DHCP Server. Then click the configure button next to the scope. Next click the DNS/WINS tab. You will notice that the SonicWALL defaults to "inherit DNS Settings". You will change it to "Specify Manually" and ensure that the first address is the DNS server on "network A" (the one with all the answers!). You might want to configure a second address of an Internet DNS server. One that will answer queries for Internet domains. That is more of a fail-safe in case the primary DNS server stops responding. It should *not* be used as an attempt to answer *all* Internet queries. Remember, your primary should be set up with DNS forwarders for that!


Use Your Domain Name - Quick, look at that illustration above. Is your domain name configured as part of your DHCP scope? It ought to be. Most folks think this is optional. But if you want your DNS server to complete your queries, this needs to be set to your name. That is, I might ask your DNS server who "SERVER1" is, and it doesn't know. But if I ask it who "SERVER1.mydomainname.com" is, I get an answer. Add your domain name to your scope, and you will fix a lot of complaints from users. If SonicWALL is not performing DHCP, and you cannot fix this on your own - consider fixing this problem on your local network adapter (or virtual VPN adapter). Basically, you drill down to IP Properties, then "Advanced", then DNS, then add a "domain name suffix" in that box near the bottom. Case closed.

Still Using WIN's? - You ought to be ashamed! But if you are using WIN's, you probably can solve your name resolution problems by adding WIN's servers to your DHCP scope. If SonicWALL is performing DHCP for you, refer to the previous illustration to see how that would be done. If you are not using WIN's, I congratulate you. WIN's was designed as a way to manage(?) NetBIOS name resolution. Most of us use DNS now (or Dynamic DNS) and we are much better for it.

If none of that worked, and you are still having name resolution problems on your SonicWALL VPN, you should send me a comment or an email. Yes, I will help you. I'm that kind of guy.

-Steve Ballantyne

Saturday, November 25, 2006

The Vow of Vina

Have you ever heard of a Vina eLink device? I sure hadn't. We had this new customer who had been using one of these little devices for several years with his T1 (fiber) connection through Nuvox. Of course, this was a Time Warner customer ... which kind of made me wonder why I had never heard of one of these little things.

Heck, I had to go out Googling to find anything. What I found was a lot of forums where people were asking each other where to find documentation (a bad sign) and a couple redirectors to websites that no longer exist. This is when http://web.archive.org/ comes in very handy. I pull up this Vina companies web site from a year or so ago (when it still was "live") and it seems that they have been acquired. Good news, actually. Next I go out looking for the company that bought them. Sadly, they too have closed their doors forever and accepted financial defeat.

The best information I could find on this device ended up being from eBay, where kind folks were trying to unload these little devices, and make them sound appealing. I was at least able to get a photo of this device that I would be supporting from afar.

It looks like a very cheap cable modem ... or something. At any rate, this company had one and wanted to keep using it. Normally, I would tell them to get that peice of junk out of my way so that we could put our SonicWALL where it belongs. After talking to the Time Warner sales contact for this account, I learned that they were going to be a Nuvox customer a little longer than intended. In other words, Time Warner's installation was delayed for a few months while they cut through all the red tape trying to lay fiber conduits. But the SonicWALL had to be installed to support the VPN this guy wanted.


One might wonder why I volunteered to work on "Black Friday", the biggest shopping day of the year. There were a couple of perks. One being, that I got to choose any other day I wanted and have that day off in trade. The second being that it was a holiday for most of the free world ... and I didn't expect many phone calls. I was half right. The entire day I got maybe five phone calls. It just happens that one of those calls was to make this stupid little router work.

The customer called, and we bagan to play with various settings. I would ask him what he saw in the way of physical connections and telnet dialogue with the device, and he would try to relay that information back to me. We got nowhere fast. After an hour or so, he asked "would you like to connect and try some things?". My first response was "I have zero knowledge in configuring these devices", and my second response was "what's the password?". So in I went.

It kind of ran like a Cisco router. That is, the CLI was quite similar. That is, you had all sorts of settings, within settings, withing settings ... you get the idea. The organization was "hierarchical" and horrible to trip through. I also found that the engineers made an attempt to shorten all of the settings to one or two hyphenated words. A setting of "ip" made you wonder just what were you setting the IP to, exactly?

I also found that the customer knew far more about this device, and how he had configured it. What are these "groups" I see here? He answers, "grouped settings". I ask, "you mean like VLANS ... or trunks?". He answers "yes", indicating that he clearly has no idea himself. From the appearance, it looked like he had a combination of addresses that were being NAT'd from public addresses to private ones ... but also some addresses that were being passed clean through. Which led me to believe that his mail server might be publically accessible, without any firewall whatsoever. I knew at this point, that I would never be able to configure this device without some sort of assistance. "Let me call you back", I said.

My next phone call was to Nuvox. If you have not dealt with Nuvox, let me say a few polite words about them. Whenever I have asked them for documentation about a customer such as "what IP block do they have, and what would their gateway be" I am always given a very complete list of everything I need to know - and it's always been e-mailed quickly. When I have had to call them, I always get a live person relatively easily ... and they have never been unhelpful "screen readers". I prayed for the best and dialed the number.

I got a guy named "Jimmy" who was about to make my day. Jimmy had full knowledge of these devices, and he was happy to share that with me. It probably also made Jimmy feel a little better when I assured him that while I knew nothing about this little device, I wasn't a complete moron. He asked very simply "what is it that you want this device to do for you?". My response was "can we just pass everything through it, and put it in a transparent mode?". His answer was a resounding "absolutely". Now here is what sets the support apart from most people you are familiar with having to deal with. When Jimmy asked whose device this was, I had to tell the truth. "They bought it man ... but if it helps, they bought it from you". I went on to tell him that I know this is not his problem, but that didn't seem to matter to him. "I can't configure the device for you - but I can tell you exactly what you need to do". Thank you Jimmy.

Here is what we did. Now, pay attention - because what we are going to do here is to put a Vina router in "passthrough mode". That means that it's no longer going to perform NAT to private addresses any more. Rather, my SonicWALL which will be plugged into it - is going to have a public address. Now, on with the show.

We start by logging in, which meant a telnet session to it's public IP address ...


telnet x.x.x.x


Vina Technologies eLink 216 (5.1.1 build 12)
Built: Jun 3 2002, 18:25:46
NVRAM version 0117
PB $Id: romInit.s,v 1.7 1997/09/26 23:43:22 bob Exp $

Copyright 1996 - 2002 VINA Technologies, Inc.
Please enter name: your name here


Enter password: your password here


After putting in the credentials, you are at the "top" of a horrible hierarchy. Much like you would with a Cisco, you are going to configure this guy. So type "config" and [enter].

Next, we are at the "config" prompt, and we want to move into the Ethernet settings. So type "ether" for short, then [enter].

Once at the Ether prompt, you will see that I did a "?" [enter] to get a view of what was in the config now. Jimmy told me that I should probably do this (if for no other reason) so that I could save this session and use it to undo any actions that might screw things up. Good advice Jimmy. I also decided it would make good Blog material.


logged on as Carrier


>config

(config)>eth

(config:Ethernet)>?
IP-address : 192.168.100.1 (IP-address)
netmask : 255.255.255.0 (IP-address)
secondary-ip : 192.168.100.3 (IP-address)
sec-netmask : 255.255.255.0 (IP-address)
RIP : Disable (EnableRxOnlyTxOnly[Disable])
version-RIP : 1 (12)
Link-integrity-test : on (off [on])
Help
!

See that? This thing is running with a public IP address. That's because it's performing NAT for us know. But that will become my SonicWALL's job. Therefore, we are going to give it the public IP address that I have set aside for it. This router may also have a "secondary" IP address. I'm not sure why I would want that, or how it would even be helpful. But we are going to wipe it out, by replacing it with an address of "0.0.0.0". Note that the last two octets of the public IP address have been blocked out (with x's) to "protect the innocent". ;-)

(config:Ethernet)>ip-address 64.119.x.x
(config:Ethernet)>netmask 255.255.255.248
(config:Ethernet)>??
IP-address : 64.19.x.x (IP-address)
netmask : 255.255.255.248 (IP-address)
secondary-ip : 192.168.100.3 (IP-address)
sec-netmask : 255.255.255.0 (IP-address)
RIP : Disable (EnableRxOnlyTxOnly[Disable])
version-RIP : 1 (12)
Link-integrity-test : on (off [on])
Help
!


(config:Ethernet)>
(config:Ethernet)>secondary-ip 0.0.0.0

(config:Ethernet)>?
IP-address : 64.19.x.x (IP-address)
netmask : 255.255.255.248 (IP-address)
secondary-ip : 0.0.0.0 (IP-address)
sec-netmask : 255.255.255.0 (IP-address)
RIP : Disable (EnableRxOnlyTxOnly[Disable])
version-RIP : 1 (12)
Link-integrity-test : on (off [on])
Help
!

That last "?" was just to see it, get a good look, and to double check my work. Next, we need to go kill off NAT. We don't want it doing that any more. So first, we will type "exit" and [enter] once to get back to the main prompt. Then we will enter the "nat" config with the command "nat". Finally, we will disable it with a rather cryptic "enable off" command.

(config:Ethernet)>exit
(config)>nat

(config:NAT)>?
enable : on ([off] on)Dynamic ...
Static ...
PassThru ...
Show-sessions alludptcpicmpconfig
Clear-sessions alludptcpicmp
Help
!

(config:NAT)>enable off


(config:NAT)>exit

If at any time you might worry that we are going to disconnect ourselves, you may rest assured that these changes aren't going to go into effect until we apply them at the very end. If at any time we get cold feet, we could exit the config or power cycle this device and nothing would be changed.

Now, we also need to disable DHCP. It wouldn't make much sense for this device to continue handing out private addresses, when it will no longer perform NAT to those addresses.

(config)>dhcp

(config:DHCP)>?

enable : off ([off] on)
start-ip : 192.168.0.2 (IP-address)
end-ip : 192.168.0.254 (IP-address)
private-network : on (off [on])
lease-time : 600 (seconds([600]:600...7200))
dns-server : 192.168.0.1 (IP-address)
domain : (name-string)
Help
!

(config:DHCP)>enable off

(config:DHCP)>exit

Now we are almost done. We have one last step, and that's to put this thing in it's "transparent" mode. In doing so it will become a passive device. Yet, here is where I fouled up something that I later had to go back and fix. If you had enabled "passthru" on this device for any particular "group" that you configured, you will need to go disable that now. I didn't record this part of the configuration, as most people would have never attempted that. In fact, I am fairly sure that the customer hadn't meant to configure it that way, and Jimmy at Nuvox didn't catch it.

And now, the exciting conclusion ...

(config)>syn

(config:Synchronous-interface)>mod

(config:Frame-relay)>pvc 1

(config:FrameRelay:PVC1)>show

DLCI : 100 (dlci (16...991))
IP-address : 64.19.x.x (IP-addressEnet[Disable])
netmask : 255.255.255.248 (IP-address)
RIP : Disable (EnableRxOnlyTxOnly[Disable])
version-RIP : 1 ([1]2)
ENAT : OUT (PASSIN[OUT])
Help
!

(config:FrameRelay:PVC1)>enat pass

(config:FrameRelay:PVC1)>exit

(config:Frame-Relay)>exit

Brace yourself.

You are about to embark on a mission that you may not return from. You are about to save this configuration. I will warn you, there is no turning back (dum-dum-duuum!). I also should warn you that it's going to say that it will "interrupt your Data traffic" and then *hang*. And when I say it hangs, I mean that you wille get no response for a good minute or two. Do not panic. It will come back to you. Jimmy also assured me that he has never lost communication at this point, even when he was sure he had screwed things up.


(config)>save
Verifying system configuration...
Do you really want to update the system NVRAM configuration?
This may cause a temporary interruption of Data traffic [n]y: y
Updating Flash NVRAM,... wait
Updating Protected Boot Flash NVRAM... wait
DONE

That was it. The device rebooted itself, I thanked Jimmy for all of his help, and I assured him that if in fact we broke this configuration, I would never blame him for it. I also wished him a happy holiday, and leant him a bit of pity that I shared - as we had to be the only suckers that came into work on this would be day off.

After a few moments of silence, and prayer ... the device was back up. I had been running a continous ping to the device at it's newly assigned public IP address.


ping -t 64.19.x.x

At first I was getting "TTL expired in transit" messages, which indicated an upstream router was dumping off the packets because it couldn't find an appropriate place to send them. Once those turned into "Reply" messages, I was overjoyed.

Yet, I was still unable to ping my SonicWALL. I know I had configured it with the correct address. But my ping response was coming back "no response". It looked as if my packets were getting to the SonicWALL, but there was nothing coming back. Ah! The gateway. In my haste to get the device configured, I had never changed the SonicWALL's WAN interface gateway.

Note to self: next time, change the SonicWALL first - before losing connection to it forever.

Now I had to bite the bullet and call the customer. "We are so close to having this work", I assured, "but I am going to need your help". While the customer was not all that technically "with it" (he was the first to say so), he was pretty good at following instructions. With that, I walked him through connecting to the SonicWALL and changing the WAN interface gateway IP. What is the SonicWALL's WAN gateway? Why, it's that *same* address that we gave to the Vina eLink.

Now, to see if the SonicWALL was even connected to the Vina and "speaking to it", I ran another telnet session back into the device to check it's ARP cache.


telnet 64.19.x.x


Vina Technologies eLink 216 (5.1.1 build 12)
Built: Jun 3 2002, 18:25:46
NVRAM version 0117
PB $Id: romInit.s,v 1.7 1997/09/26 23:43:22 bob Exp $

Copyright 1996 - 2002 VINA Technologies, Inc.
Please enter name: your name here
Enter password: your password here

logged on as Carrier

(config)>arp

(config:ARP)>show
64.19.x.x at 0:6:b1:x:x:x


(config:ARP)>


(config)>exit


Good, good. What that told me, is that the SonicWALL is communicating with the Vina, and the customer must have plugged it in correctly (he actually hadn't plugged it in right, but I am omitting the 30 minutes or so that it took me to figure that out).

Now, I could once and for all connect to my SonicWALL and configure the device the rest of the way. One server at a time, I created the needed NAT Policies and Access Rules. Everything from here on was clockwork.

Lessons learned?

1) Don't believe the customer when he says he plugged it in right. Even after he says he has double checked it too. I have found that it helps to ask the customer where things go, and make them tell you what is connected to what devices. In a polite way, suggest what you all ready know - "well it just seems that the blue cable is connected to the red port ... is that possible?".

2) Don't assume that the ISP's telephone support will be worthless. While most companies send those calls overseas to a foreign "screen reader", this company took me straight to the resolution without tripping through a maze of prompts. Had I called them to begin with, I probably would have cut a few hours out of this lengthy process.

3) Remember to make your changes to devices, that you will ultimately loose access to - while you have the chance. Leading the customer through changing things for you is tedious, frustrating, and time consuming.

I might add a final step here, if you are someone in the sales Field. The motto is not "over-promise and under-deliver". You had better not agree to hooking up your equipment in an environment that you are not familiar with yourself. Not all devices are created equal. What works and is supported now, may not be once everything is connected. In this particular situation, the customer hadn't lost interest in his new service thanks to the effort we put forth. I should add here, that we started trying to get everything to work nearly one month earlier.

There is a another good story that follows this one. I will make the long story short.

The customer returned home, and connected his cable modem, and then his SonicWALL behind it which had both been sitting in a box for a couple of weeks. Then he called me. He was anxious to get the VPN tunnel built between work and home so that he could access everything at the office, from his home office. I walked him through hooking everything up, and I made my first attempts to connect to the SonicWALL by it's registered Dynamic DNS host name. The SonicWALL, as planned, had made contact and updated it's DNS record with it's new public address. What was that public address? 192.168.0.13. Yes, it had been loaned a private address from none other than the cable modem (router) in front of it. There was no possible way that I was going to be able to fix this one. Time Warner doesn't allow us access to their cable modems, and we needed to do the same thing to that modem that we worked on all day with his Vina.

I let him down easy. "I have a technician to murder Monday morning ... in the mean time this is not going to work". He was content with that knowing that I had just put four hours or more into this process and I was just as disappointed that we had hit a stone wall as he was. Again, he thanked me for the work, I thanked him for his patience, and we ended the day.

Happy Thanksgiving,
-Steve Ballantyne