Thursday, May 22, 2008

Green Wallpapers

Do you like green wallpapers? You are not alone. There seems to be an abundance of lovely chloroform laced wallpapers out there. Some of the extreme close-up photography has got me asking "did nature make that?". Whether you are just celebrating the outdoors or you are sick of that ugly field in Windows XP ... here are some green wallpapers that are sure to please.

I have linked all of these thumbnails to their homes on Interfacelift.com which features some of the most stunning photography I've ever seen. And yes, they have wallpaper in your size (including wide screen displays).


Still need more green? Try this search!

*NEW* I will be getting an EEE PC soon to use at work. If you have an EEE PC, and are looking for some nice green wallpaper, look no further. Download this zip package which includes all the above wallpaper which I have scaled and cropped to fit the 800x480 dimensions of the screen.

-Steve Ballantyne

Tuesday, May 20, 2008

Fun with Screenlets in Ubuntu

If you're not big on eye candy, this software likely won't "do it for you". In the spirit of things that you really don't need cluttering up your desktop - I bring you "Screenlets". The idea is that a Screenlet is a desktop widget. These widgets range from things that you might want to keep at arms length, to silly gadgets that might entertain the duller moments of your day. These widgets can be "locked down" so that they become active elements of your wallpaper (more or less). If you have used Windows Vista or modern versions of OS X you should be familiar with this concept. Most folks keep their widgets floating around the right edge of their screen.

Admittedly this whole concept is growing old but I was impressed with how easy it is to install Screenlets in Ubuntu, add a collection of fun gadgets, and perhaps even create your own. Screenlets are written using the popular Python scripting engine. While I have had bad luck with similar widget engines in the past, it seems that using common libraries and Python elements has allowed the desktop widget concept to become stable and usable. I have played with these same widgets for several days and have yet to crash anything, or suffer through any error messages.

You can install Screenlets in Ubuntu with a single command in terminal:
sudo apt-get install screenlets

The above will also add all the supporting libraries, and the default "base" of Screenlets to begin using. It's likely that whatever you had in mind comes in the default Screenlet collection. If not, there are few hundred more available from http://www.screenlets.org. There's a large community of widget developers and users out there sharing their ideas.

Once you have installed Screenlets, you can begin adding your widgets using the Screenlets Manager. To access the manager, click System > Preferences > Screenlets. You may also use a "Screenlets Daemon" icon which should appear in the upper right hand corner of your display near the time and volume control slider.

Here you can select a Screenlet, and click "Add" to the right. It should immediately appear on your Desktop. From there you should be able to slide them around by clicking and dragging on them. With a right-click you will find options to change the size of the widget, decide if they should linger on top or underneath your windows, and even "lock" them into place to prevent the accidental sliding around of them. I installed a few common Screenlets and took this screen shot.


These widgets are pretty large on my desktop. The only one I really refer to often is the old analog clock. It's nice to have an analog clock, with the correct time displayed on it. We actually have three analog clocks in my department at the office. They are all battery operated, and each keep their own time. One has recently quit all together, and rather fuss with it I have decided that this clock should display "important times in nerd history". This weeks theme was Back to the Future. I'm waiting for the strike of lightning that will take Marty back to 1985.


Now, go get busy cluttering your desktop with stupid eye candy. It's time well wasted.

-Steve Ballantyne

Thursday, May 15, 2008

Windows XP Service Pack 3 - Choose Your Browser

Having applied the newly released Windows XP Service Pack 3 to my virtual administrative machine yesterday I can now safely say "mistakes were made". This morning I spent a good couple of hours trying to determine what went wrong, and how to correct it. I hope you can learn from my mistakes. This is what I discovered.

1) Once you install Windows XP Service Pack 3, you will never be able to change your browser. If you were running IE 6, you will be stuck with it from here until re-installation (that's a joke). If you have IE 7, you can never revert back to IE 6. That "uninstall IE 7" ability will be removed upon successful installation of Service Pack 3.

2) If you were running IE 6, and then installed SP3, you can never have IE 7. Attempts to install it manually will fail.

3) If you are stuck with IE 6, you cannot install post IE 7 updates, for which there are about three. You would think Windows Update would recognize this flaw and not attempt to install these updates that you cannot even accept, but that is not the case. If you get stuck in this loop, you will have 3 updates that are pending installation ... forever. Every time you update, it will fail. Every time. Sucks to be you.

4) If you install Windows XP right out of the box (like a normal clean install) and run through the updates that are recommended to you - you will effectively screw things up. That's because Windows Update will not offer you the IE 7 update until after you have installed SP 3 and it's too late.

With all that said - here is how you *should* update Windows XP. First, install Windows XP Service Pack 2 if it's not all ready streamlined into your product disc. Then run Windows Update and grab the dozen or so updates that are offered, and reboot. Run Windows Update again. If it offers you Service Pack 3, stop there and don't install it. Now browse to the home for IE 7 and choose to "Download Now". You want to install it manually. Once that completes, reboot. At this point you can run Windows Update and accept the Service Pack 3 update.

Hey Microsoft, what the hell are you thinking?

-Steve Ballantyne

Wednesday, May 14, 2008

Watch Movie DVD's in Ubuntu

Due to some rather silly and lengthy legalities, Ubuntu Linux does not install in a state that allow you to watch a regular old DVD movie. I have tried without success on multiple occasions in the past to insert a disc to watch - only to have it fail. It never really occurred to me that this was "by design" and I always assumed that it must have been something I was doing wrong. Recently I found that I could play any of the movies that I had created (without encryption) but not a single commercial disc.

After some investigation I learned that you can enable the ability to watch commercial discs rather easily, but it's likely illegal (read the fine print).

Rather than act as if I came up with the solution, I am pasting a link to a pretty good article on the subject matter. While the article was written on earlier versions of Ubuntu, this trick still seems to work on the latest release (Hardy Heron).

How to enable DVD playback

-Steve Ballantyne

Tuesday, May 13, 2008

Scheduled and automated Secure FTP (SSL)

A few months ago I had a request from one of our department members to automate a tedious process. One of our health systems crank out a plain text file which on a daily basis needs to be sent off to an insurance carrier. The insurance company uses FTP to facilitate the "upload" of data, but there is a catch. Because this information contains patient health data, you would not want to send it in plain text. Their method of securing the data is to use certificate based secure FTP. I should state that there are other methods of securing FTP traffic, namely with SSH tunneling. Using certificates for an FTP server is not common practice, and so automating it was difficult.

Here is the script that I created which happily runs on an Ubuntu Linux box. Note that names, passwords, and the like have been removed to protect confidentiality.

#!/bin/bash
#
# HL7 FTP drop
# By Steve Ballantyne 02-28-08
#

# Calculate the date in specified format and make a directory with it
TIME=`date +%m-%d-%Y`
# Build working directory
if [ -f /data/healthinsurance/README.txt ]
then
sleep 0
else
mkdir "/data/healthinsurance/$TIME"
fi

cd "/data/healthinsurance/$TIME"

# Check for SERVER Share
if [ -f /mnt/healthinsurance/README.txt ]
then
mv /mnt/healthinsurance/Submissions/healthinsurance/working/KCHDEM* /data/healthinsurance/$TIME
else
#Map to SERVER drive
mount -t smbfs -o username=ballantynesd,password=password "//SERVER/e$" /mnt/healthinsurance
# Now move it
mv /mnt/healthinsurance/Submissions/healthinsurance/working/KCHDEM* /data/healthinsurance/$TIME
fi

# Go put the file on the server
curl --ftp-ssl ftp://ftp.generichealthcare.com -u username:password -T /data/healthinsurance/$TIME/KCHDEM*.txt --insecure
# Done - Exit


Here's the play-by-play of what this script does.

1) A check is made for a README file. If this file doesn't exist, someone may have messed with our directory structure.
2) A date variable is created in the form of MM-DD-YYYY. Then, a directory is created using that variable, and we change directory, or 'cd', into it.
3) We check to see if a README file exists on a shared drive, which has been mounted. If it does not exist - then the drive has come un-mounted so we run through a routine to re-mount the Windows share.
4) Once the mounting issue is resolved, we move the file from the SERVER into that local folder we created with the date variable.
5) With the file in our grips, we use 'curl' to send the file to the health insurance company. Note that we needed two special switches: '--ftp-ssl' and '--insecure'. The '--insecure' was required in my case because the certificate being used for this connection was self-signed.

Now that we understand what we are doing, how will we automate it?

I saved the above script into a file called /root/healthins.sh. Then I did a 'chmod 755 healthins.sh' so that it was executable. Next, I became root by using 'su -' and supplying the root password. Finally, I ran 'crontab -e' which allowed me to edit the root users cron entries.

This is the line I added to the bottom of my scheduled jobs (it was empty).

1 1 * * * /root/healthins.sh >> /root/healthins.log 2>>&1

That line says that on the first minute of the first hour of every day ... run the script called 'healthins.sh' which exists in the /root directory. Then, redirect all of the output from this process into a log file called 'healthins.log' which also exists in root. The '>>' indicates that this file should be appended. That is, *added to* and not overwritten.

I'm happy to say that this has been running well, aside from a mistake I had made in my logging process. But I figured since I was in fixing this - I should document this process for future generations. If this helped you in some way, won't you please drop me a line?

-Steve Ballantyne

Friday, May 09, 2008

Dress up Ubuntu 8.04 Hardy to look like gOS Space

The nice people over at 
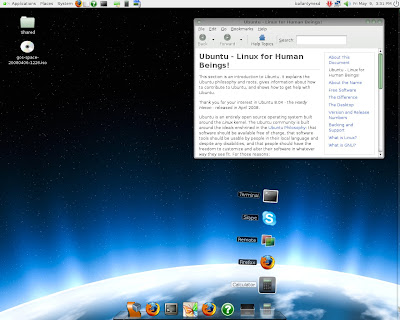
gOS (read: good Operating System) have released their latest project called "gOS Space". Think Ubuntu, if you layered it up with some eye candy, and then added a nifty dockbar and populated it with MySpace and YouTube Launchers. I have to admit that the visual appearance is pretty good. It's also oddly familiar, because with all of these various pieces mixed together, it resembles the latest OS from Apple.

I downloaded it and tried to boot it in a virtual PC (using VirtualBox). I failed. I also tried burning it to a CD-ROM and I failed at that too. That's because the ISO image is about 68 meg's off from fitting on a standard CD. So I grabbed a DVD and burned a copy. Then I booted it up. The "beauty" of gOS is that you don't have to install it. You can boot to it, and try it out. I tried it. I played with it a while. I was ready to get back to Ubuntu which I had all ready installed, but I wanted to take this nice theme with me.


Here's how you can re-theme your Ubuntu 8.04 Hardy with the pretty space theme.

#1 - Get the wallpaper
If all you wanted was the wallpaper, this is an easy task for you. Because I have mirrored it. you can right click here and download a copy. Then make it your background. You're done!

#2 - Install the wicked green bubbly window theme
One of the niftier looking aspects of this theme are the windows. You won't really see what these look like unless you do some digging. The screen-shots on the gOS site don't show them. I borrowed them the best way I knew how. Find the directories ... tar-ball them up ... and carry them over.

* Right click here and Download this file (save it anywhere).
* Move the file to the root of the file system, and un-tar it. In a Terminal ...
cd Desktop
sudo mv newgosspace.tar.gz /
cd /
sudo tar -xzvf newgosspace.tar.gz

* Apply the theme you just installed: click System > Preferences > Appearance. Then select the "gOS_Theme". Click "apply".
* You're done. Everything is green.

#3 - Install the pretty Dock Bar
gOS makes use of the "Avant Window Navigator". This has been around for quite a while, and can be installed relatively easily to Ubuntu Hardy. But ... the version that they are using for gOS is slightly newer than what you would get from the Hardy repositories. Trust me, you will want the latest stuff if you want the full effect. Namely, what the new version offers over the old one is a big collection of "applets" for your dock-bar, and that neat looking "tilted tile" of your icons (as seen in the screenshot).

If you want to live on the edge, and install the latest stuff ...

* Open up /etc/apt/sources.list and add this line to the bottom:
deb http://ppa.launchpad.net/reacocard-awn/ubuntu hardy main
You will need roots authority to save this file, so you might want to run something like "sudo gedit /etc/apt/sources.list" to open it.
* Now, in a Terminal run "sudo apt-get update".
* Also in a terminal, run this ...
sudo apt-get install awn-core-applets-bzr avant-window-navigator-bzr python-alsaaudio python-awn-bzr python-feedparser
* You will be asked if you want to install all the above, plus some dependencies. Say Yes!

You are almost done. But here is the problem: you have no "preferences manager". Why didn't you install it in the above command? Because it won't work. Basically, you are mixing old and new parts of this application together, and Ubuntu doesn't like it.

* Open this web page, and find the version of awn-manager-bzr_0.3.1.bzr234.1~hardy that matches your version of Ubuntu and PC type. If you are running Hardy and have a standard Intel i386 version, you want to download this one.
* Find the file you just downloaded, and open it (double click it). Then, click the green Install button to install the package. You may be told that this same package exists in your repository. You should ignore that message. It's referring to an earlier release of that same package.
* Click Applications > Accessories > Avant Window Navigator. It should launch at the bottom.

If you were using a "bottom Panel" you now have some real redundancy going on here. You may move that bar to the right side of the screen (click and drag it) or you can right click on it and "delete it". I suggest you keep it around in case you don't like this dock bar (it's been known to be buggy, while it's been very stable for me).

Now you have some configuration to do. If you right click the left most portion of this Avant bar (there's an empty little slice there) you can select "Preferences". From there you can add applets, and the like. I suggest you add the "Stacker" applet (one for each stacker menu you want to create). Then you can right click on each Stacker (as it appears in the dock bar) and click "Preferences". If you would like to use the "visual styling" that I created for my dock, you can download this file. Just save it somewhere handy, and in the dock preferences, click the Themes tab, then Add, and browse to that file. I found the manager to be a bit buggy with themes. If you add the theme, and it doesn't show up in the list - close the manager and re-open it.

If you want the slick Apple look for a Stacker... click the Backend tab and choose "Folder backend". Point it to a folder which contains shortcuts. If you don't have a folder of shortcuts - create one and come back. Click on the Applet Layout tab and check "Composite applet icon". Click the Stack Layout tab and change the Layout to "Curved gui". You may want to fiddle with the other options and tweak them to your liking.

Now you can run full fledged Ubuntu, with all the style of gOS Space! Enjoy.

-Steve Ballantyne